SSM Build Automation
Deploy SSM Build Automation
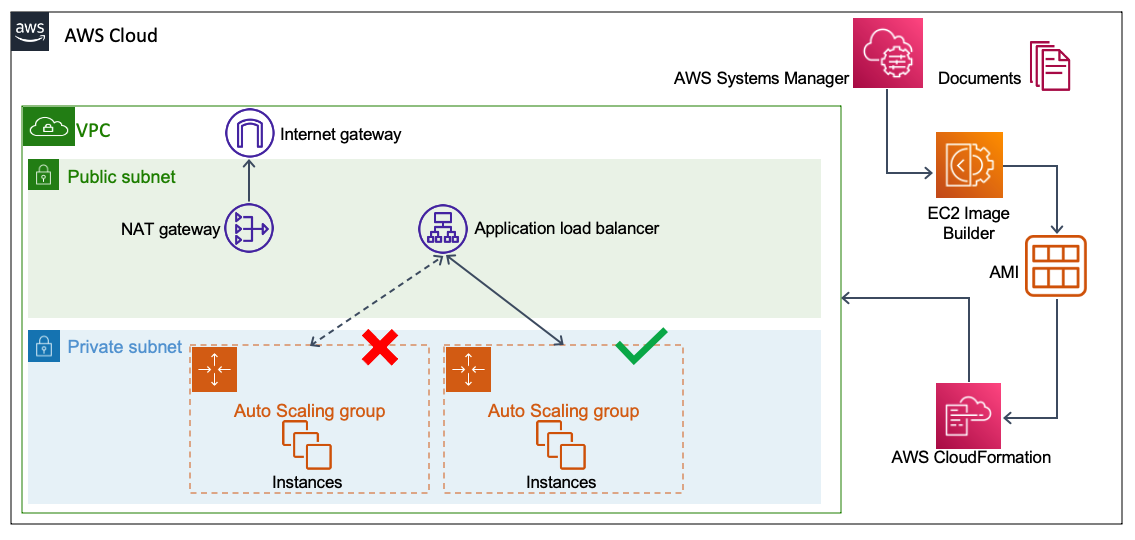
After completing the Builder Pipeline in the previous section, we will proceed to the automated deployment phase using the Systems Manager service. With the goal of deploying the new AMI that has completed OS Patching to the current application infrastructure, we will use an Automation Document.
With the Automation Document, the following activities will be executed sequentially:
- Automatically trigger the Builder Pipeline.
- Wait for the new AMI with completed OS Patching to be created.
- Update the CloudFormation Stack of the application with the new AMI value.
- Automatically trigger the
AutoScalingReplacingUpdatepolicy to deploy the Blue/Green Deployment method for the Auto Scaling Group.
With this approach, we will minimize the total time from initiating the AMI to updating the application infrastructure, which is extremely useful and avoids disruption to the user experience.
Furthermore, the key to this automation process is the AutoScalingReplacingUpdate policy to simplify the complexity of implementing the Blue/Green Deployment method manually. To easily visualize, let’s consider the following process:
- First, the
AmazonMachineImageparameter of thepattern3-appStack is updated with the new AMI ID, prompting CloudFormation to create a new version of the Launch Template. - Since the Auto Scaling Group references the
LatestVersionNumberof the Launch Template, CloudFormation recognizes this as a replacement change and proceeds to create a new Auto Scaling Group using the patched AMI. - CloudFormation waits until the new EC2 instances send the
cfn-signaland are evaluated by the Load Balancer with aHealth CheckofHealthy.- When the result is
Healthy, CloudFormation shifts traffic to the new Auto Scaling Group and deletes the old Auto Scaling Group. - When the result is
Unhealthy, CloudFormation proceeds to roll back the update process and retains the existing resources.
- When the result is
CloudFormation Stack
To proceed with infrastructure deployment, we will use the AWS CloudFormation service via the AWS Console or AWS CLI.
| Component | Value (Required) |
|---|---|
| Stack Name | pattern3-automate |
| Template | pattern3-automate.yml - download in the Template section below |
| ImageBuilderPipelineStack | pattern3-pipeline |
| ApplicationStack | pattern3-app |
Please download the template here:
AWS CLI
Here are the initialization steps via AWS CLI:
- Create CloudFormation Stack
aws cloudformation create-stack --stack-name pattern3-automate --template-body file://pattern3-automate.yml --parameters ParameterKey=ApplicationStack,ParameterValue=pattern3-app ParameterKey=ImageBuilderPipelineStack,ParameterValue=pattern3-pipeline --capabilities CAPABILITY_IAM --region ap-southeast-2

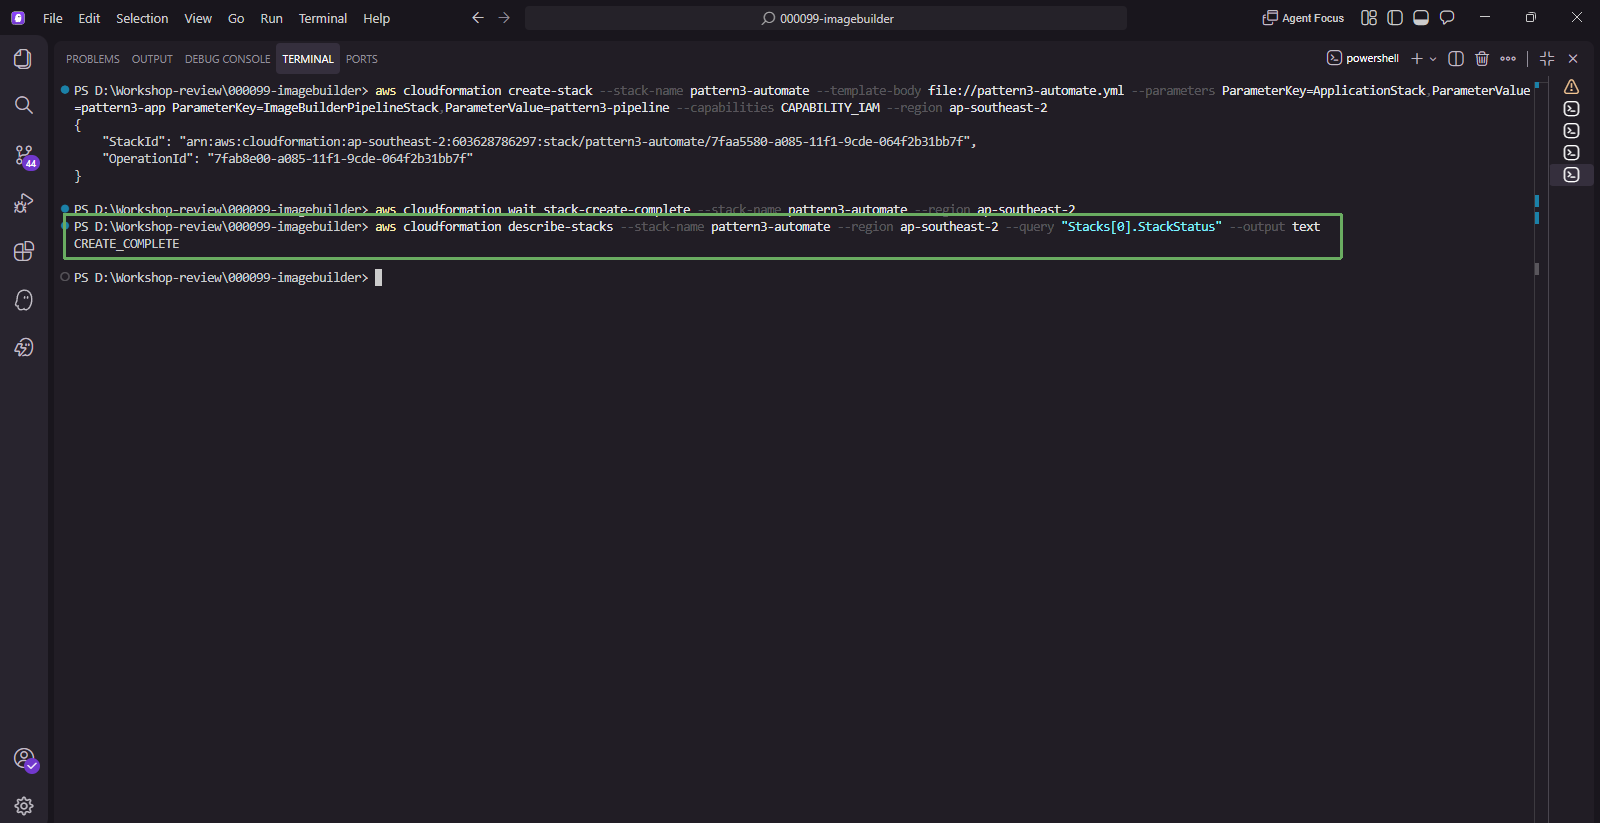
Wait for the Stack to complete creation, this step only takes about 1 minute.
aws cloudformation wait stack-create-complete --stack-name pattern3-automate --region ap-southeast-2Verify that the CloudFormation Stack has been successfully created with the StackStatus as
CREATE_COMPLETE.aws cloudformation describe-stacks --stack-name pattern3-automate --region ap-southeast-2 --query "Stacks[0].StackStatus" --output text
- Note down the name of the Automation Document from the Outputs.
aws cloudformation describe-stacks --stack-name pattern3-automate --region ap-southeast-2 --query "Stacks[0].Outputs" --output table
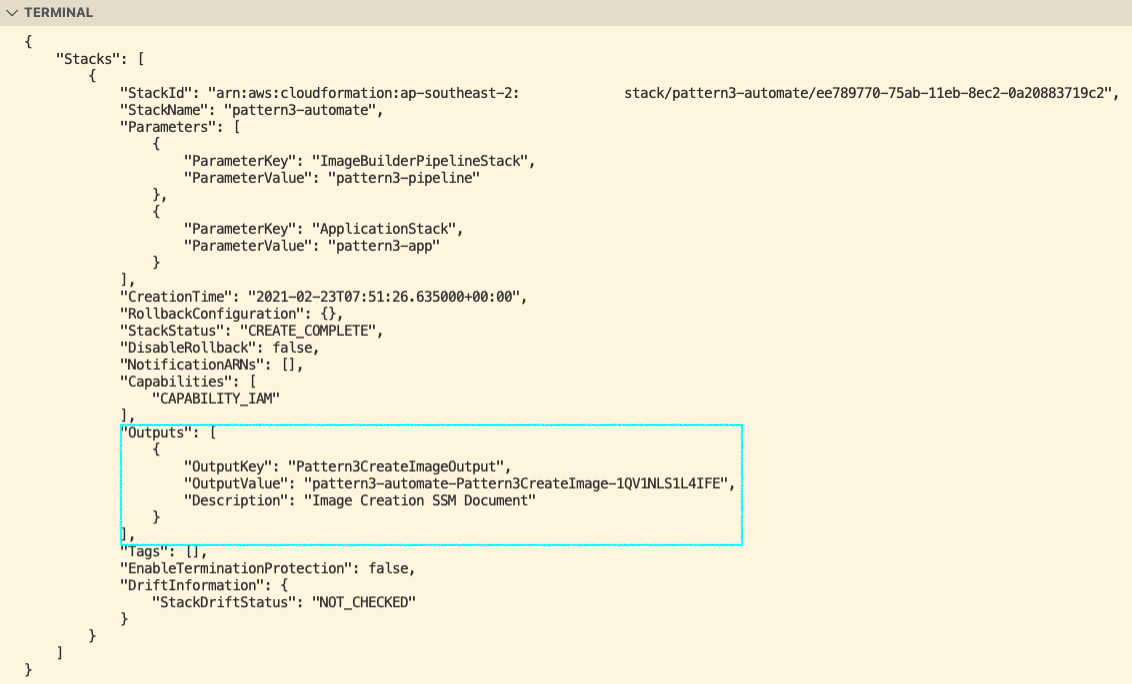
At this point, the Automation Document has been successfully created. The pattern3-automate Stack creates only one resource AWS::SSM::Document, and the name of the document is in the Outputs under Pattern3CreateImageOutput.
If you deployed using CloudFormation, you can skip the Manual Creation Steps below and proceed directly to Prepare Monitoring Script. However, you should read the Specification Details, as it explains the logic behind the entire automation process.
Prepare Automation Document
This section contains two parts. You only need to follow one of the two ways to obtain the Automation Document:
| Method | When to use |
|---|---|
CloudFormation Stack pattern3-automate in the previous section | Fast, error-free, recommended |
| Create manually from the Console following the steps below | When you want to see each operational step |
Manual Creation Steps
Only do this part if you did not deploy the pattern3-automate Stack in the previous section:
- Access the Systems Manager service.
- In the left navigation pane, under Change Management Tools, select Documents.
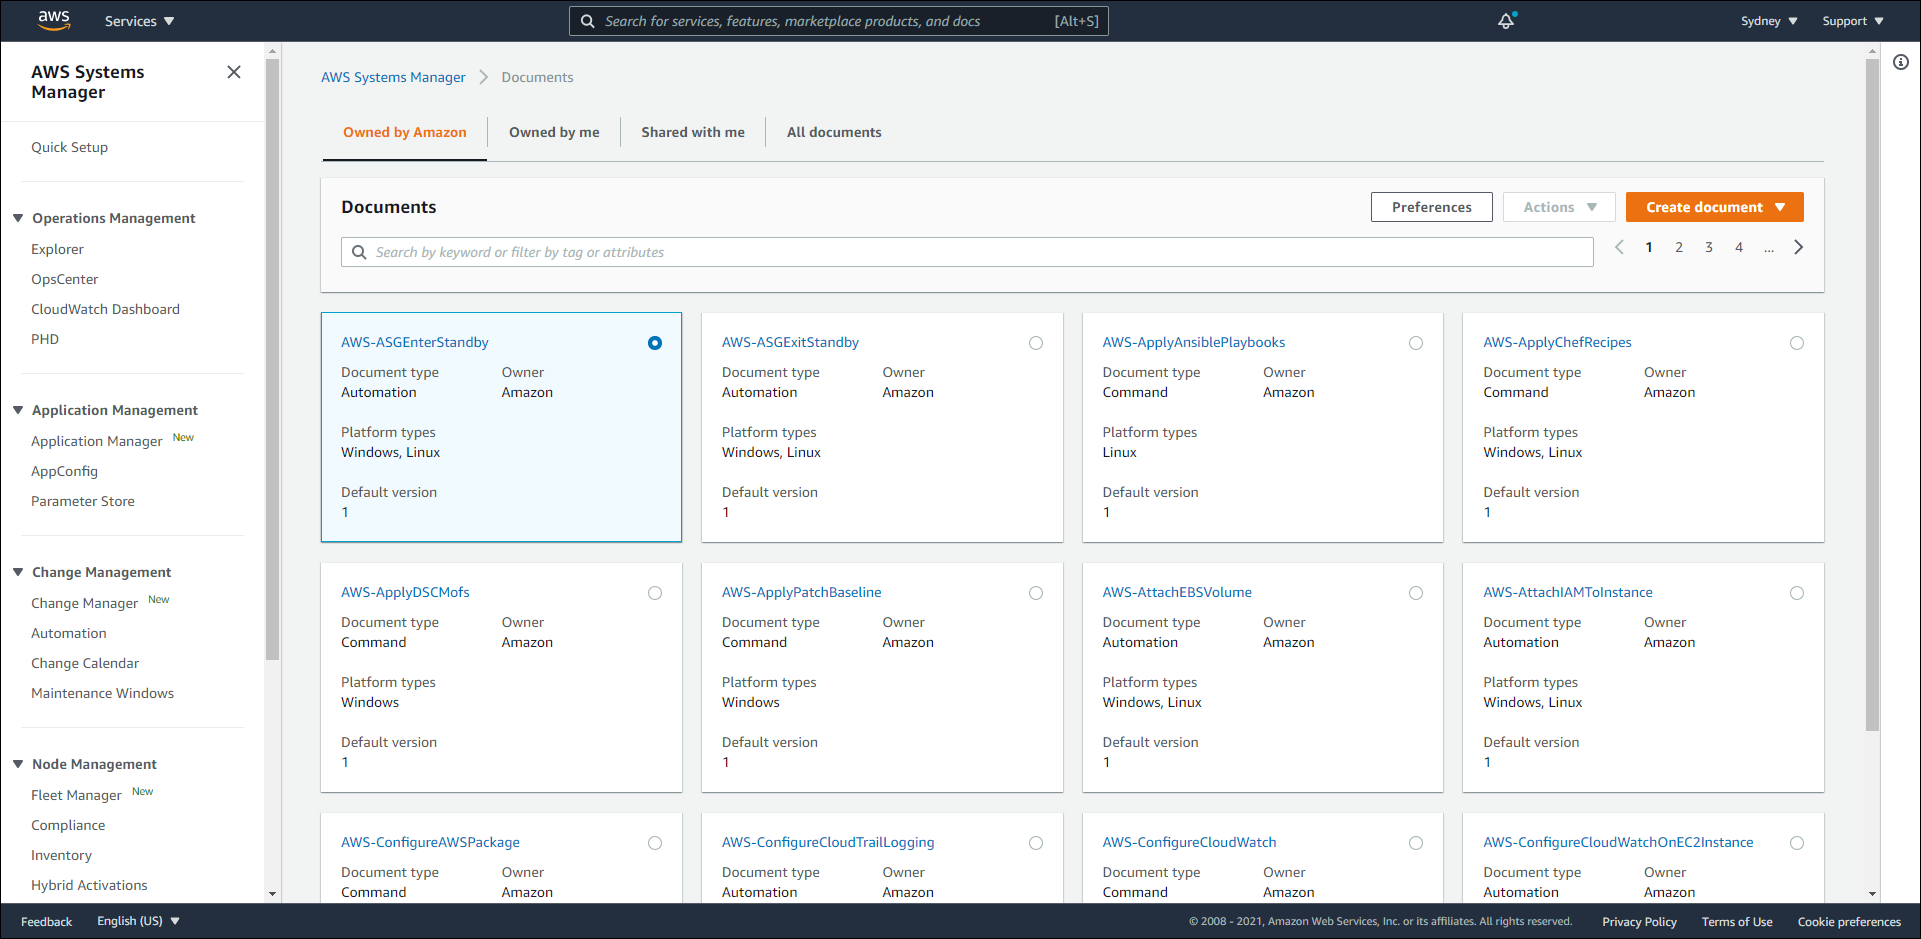
At the top right of the Documents pane, click the orange
Create documentbutton, then selectAutomationfrom the dropdown list.The runbook design page opens with the default name
NewRunbook. Click on the pencil icon next to that name and change it topattern3-automate-CreateImage.In the top bar, switch from
Designmode to{} Codemode, and ensure the format selector on the right is set toYAML.Delete the sample content in the editor pane, then paste the entire YAML specification found in the Specification Details section below.
Click the orange
Create runbookbutton at the top right. The document will appear in the Owned by me tab on the Documents page.
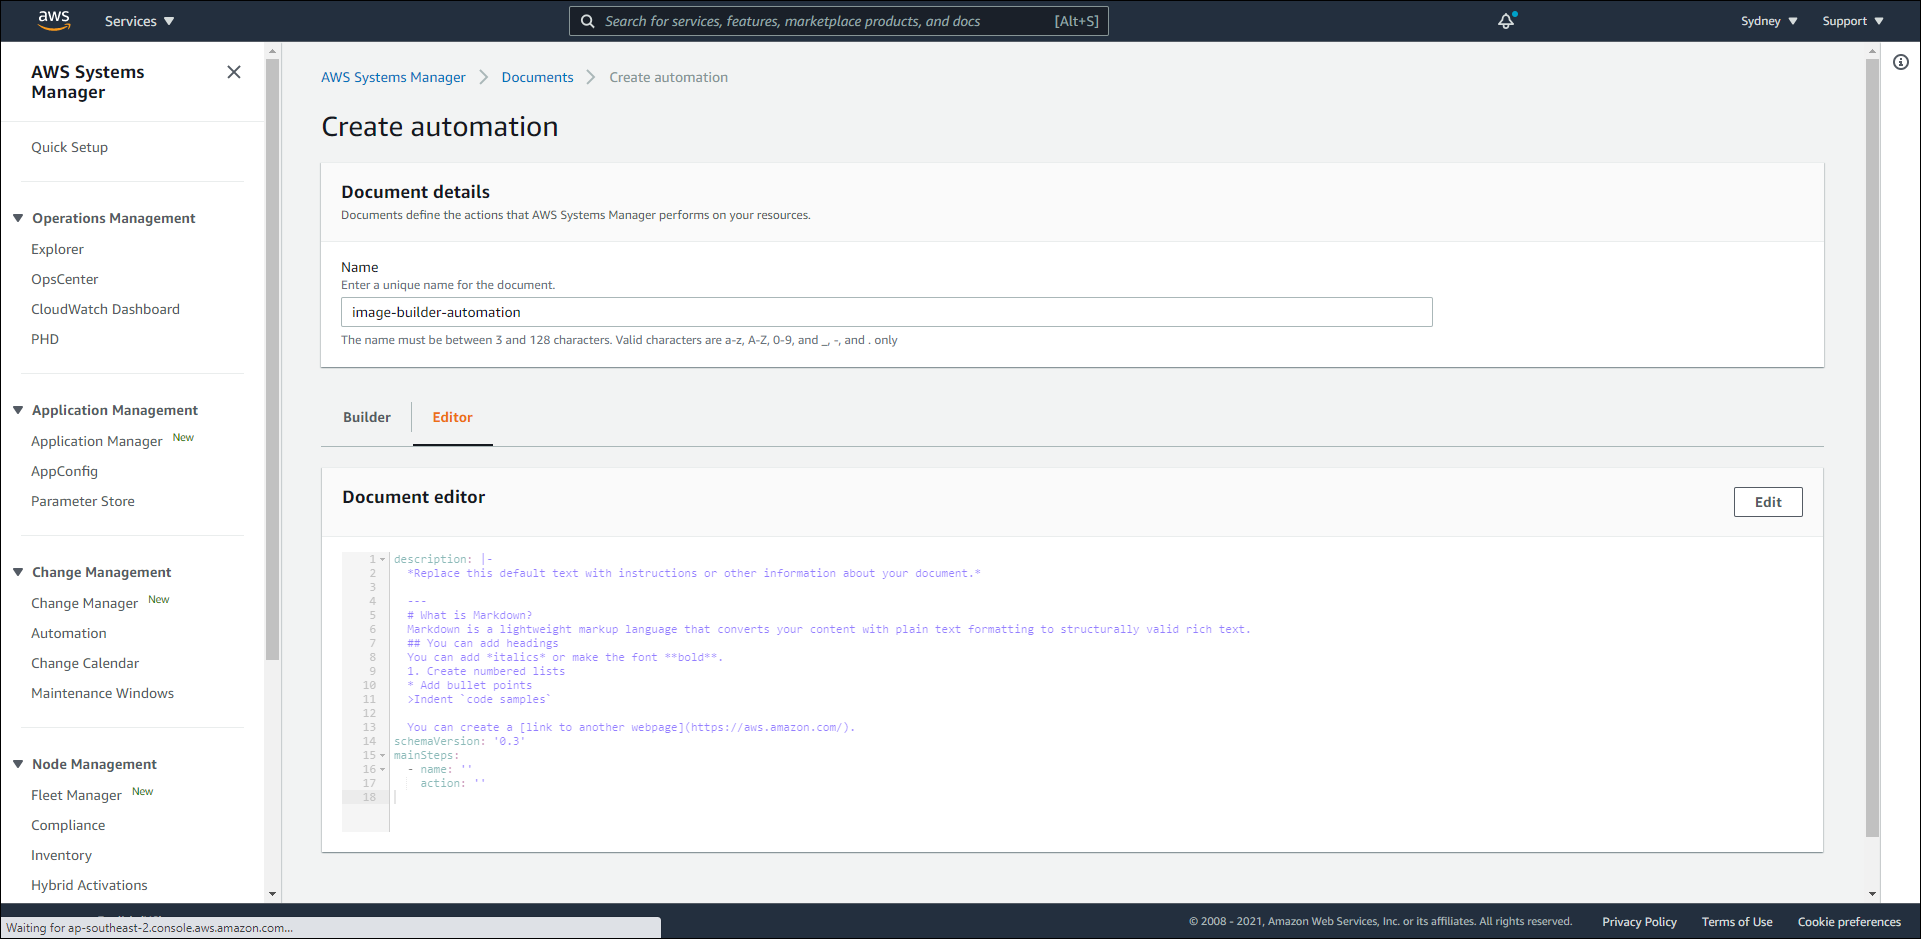
When created manually, the two parameters of the runbook will not have default values. The default value in the pattern3-automate.yml file is generated from Fn::ImportValue of CloudFormation, so it doesn’t exist through the manual route.
You have two options:
- Pre-fill
defaultinto the YAML before pasting, replacing<YOUR_PIPELINE_ARN>with the actual ARN:parameters: ImageBuilderPipeline: default: <YOUR_PIPELINE_ARN> description: (Required) ARN of the EC2 Image Builder Pipeline to execute. type: String ApplicationStack: default: pattern3-app description: (Required) Name of the Application Stack where the new AMI will be deployed. type: String - Or leave it as is and pass parameters every time you run it, using the explicit command format in the Execute Automation Document section.
Retrieve the pipeline ARN using the following command:
aws imagebuilder list-image-pipelines --region ap-southeast-2 --query "imagePipelineList[?name=='pattern3-pipeline-ImagePipeline'].arn | [0]" --output text
A faster method if you find the designer cumbersome. Save the YAML specification in the Specification Details section to a file named createimage.yml, then create the document using a single command:
aws ssm create-document --name pattern3-automate-CreateImage --document-type Automation --document-format YAML --content file://createimage.yml --region ap-southeast-2
Check the result:
aws ssm describe-document --name pattern3-automate-CreateImage --region ap-southeast-2 --query "Document.{Name:Name,Type:DocumentType,Status:Status}" --output table
This method doesn’t rely on the Console UI, and if you need to modify the specification, you can just edit the file and run aws ssm update-document.
Specification Details
This is the complete specification of the Automation Document, and it is the most crucial part of this chapter to read regardless of which method you chose:
- If creating manually, you paste the YAML snippet below into the
Editoron the Console. - If using CloudFormation, this YAML snippet is exactly what lies within the
Contentkey of theAWS::SSM::Documentresource in thepattern3-automate.ymlfile. In other words, CloudFormation is just a wrapper to register the document, while the actual logic resides here.
How it works:
- First, we determine the
schemaVersionand define theparameters.ImageBuilderPipeline: ARN of the Builder Pipeline we created in the previous section.ApplicationStack: Name of the CloudFormation Stack for the application -pattern3-app.
- Next is the
mainStepsspecification. Using the values of theparameters, we create an action named ExecuteImageCreation viaaws:executeAwsApi. - Then, we need to wait until the AMI finishes building using
aws:waitForAwsResourceProperty. This is the longest step, taking about 20 to 30 minutes. - Once the AMI is in the
AVAILABLEstatus, the GetBuiltImage action extracts the AMI ID and passes this value to the next step. - After obtaining the AMI ID, the UpdateCluster action proceeds to update the CloudFormation Stack of the application.
- Finally, wait until the update process completes with the status
UPDATE_COMPLETE.
description: >-
  Run the EC2 Image Builder pipeline to create a patched AMI, then update the
  Application Stack to deploy the new AMI via a Blue/Green methodology.
schemaVersion: '0.3'
parameters:
  ImageBuilderPipeline:
    description: (Required) ARN of the EC2 Image Builder Pipeline to execute.
    type: String
  ApplicationStack:
    description: (Required) Name of the Application Stack where the new AMI will be deployed.
    type: String
outputs:
  - GetBuiltImage.image
mainSteps:
  - name: ExecuteImageCreation
    action: aws:executeAwsApi
    maxAttempts: 3
    timeoutSeconds: 600
    onFailure: Abort
    inputs:
      Service: imagebuilder
      Api: StartImagePipelineExecution
      imagePipelineArn: '{{ ImageBuilderPipeline }}'
    outputs:
      - Name: imageBuildVersionArn
        Selector: $.imageBuildVersionArn
        Type: String

  - name: WaitImageComplete
    action: aws:waitForAwsResourceProperty
    maxAttempts: 3
    timeoutSeconds: 5400
    onFailure: Abort
    inputs:
      Service: imagebuilder
      Api: GetImage
      imageBuildVersionArn: '{{ ExecuteImageCreation.imageBuildVersionArn }}'
      PropertySelector: image.state.status
      DesiredValues:
        - AVAILABLE

  - name: GetBuiltImage
    action: aws:executeAwsApi
    maxAttempts: 3
    timeoutSeconds: 600
    onFailure: Abort
    inputs:
      Service: imagebuilder
      Api: GetImage
      imageBuildVersionArn: '{{ ExecuteImageCreation.imageBuildVersionArn }}'
    outputs:
      - Name: image
        Selector: $.image.outputResources.amis[0].image
        Type: String

  - name: UpdateCluster
    action: aws:executeAwsApi
    maxAttempts: 3
    timeoutSeconds: 600
    onFailure: Abort
    inputs:
      Service: cloudformation
      Api: UpdateStack
      StackName: '{{ ApplicationStack }}'
      UsePreviousTemplate: true
      Parameters:
        - ParameterKey: BaselineVpcStack
          UsePreviousValue: true
        - ParameterKey: NumberOfInstanceCluster
          UsePreviousValue: true
        - ParameterKey: MaxNumberOfInstanceCluster
          UsePreviousValue: true
        - ParameterKey: InstanceType
          UsePreviousValue: true
        - ParameterKey: LatestAmiId
          UsePreviousValue: true
        - ParameterKey: AmazonMachineImage
          ParameterValue: '{{ GetBuiltImage.image }}'
      Capabilities:
        - CAPABILITY_IAM

  - name: WaitDeploymentComplete
    action: aws:waitForAwsResourceProperty
    maxAttempts: 3
    timeoutSeconds: 3600
    onFailure: Abort
    inputs:
      Service: cloudformation
      Api: DescribeStacks
      StackName: '{{ ApplicationStack }}'
      PropertySelector: Stacks[0].StackStatus
      DesiredValues:
        - UPDATE_COMPLETE
The UpdateCluster step must explicitly list all parameters of the Application Stack with UsePreviousValue: true, except for AmazonMachineImage which is the parameter we want to change. The reason is that the UpdateStack API will revert any unlisted parameter to its default value in the template, instead of retaining its current value. If omitted, for example, your Auto Scaling Group might be reset to its default number of instances.
This Automation Document does not declare an assumeRole, so it runs with the permissions of the invoker. The identity you use needs the following permissions: imagebuilder:StartImagePipelineExecution, imagebuilder:GetImage, cloudformation:UpdateStack, cloudformation:DescribeStacks, along with permissions for CloudFormation to update EC2, Auto Scaling, and IAM. In a real-world environment, you should create a dedicated Automation Service Role and declare it via assumeRole to limit the scope of permissions.
Prepare Monitoring Script
We proceed to prepare a basic monitoring script that continuously sends requests to the URL of the Application Load Balancer before executing the Automation Document. By doing this, we can observe the entire process before, during, and after replacing the AMI.
Create a file named watchscript.sh with the following content:
#!/bin/bash
# Monitor application availability throughout the Blue/Green deployment process.
# Usage: ./watchscript.sh http://<ALB_DNS_NAME>

TARGET="$1"

if [ -z "$TARGET" ]; then
  echo "Usage: $0 http://<ALB_DNS_NAME>"
  exit 1
fi

while true; do
  RESULT=$(curl -s -o /dev/null -w "%{http_code} %{time_total}s" --max-time 5 "$TARGET")
  AMI=$(curl -s --max-time 5 "${TARGET}/details.php" | grep -o 'ami-[0-9a-f]\{8,\}' | head -n 1)
  echo "$(date '+%H:%M:%S')  StatusCode=${RESULT}  AMI=${AMI:-n/a}"
  sleep 2
done
Grant execute permission and run the script with the Load Balancer’s DNS name:
chmod +x watchscript.sh

ALB=$(aws cloudformation describe-stacks --stack-name pattern3-app --region ap-southeast-2 --query "Stacks[0].Outputs[?OutputKey=='OutputPattern3ALBDNSName'].OutputValue" --output text)

./watchscript.sh "http://${ALB}"
Create a file named watchscript.ps1 with the following content:
# Monitor application availability throughout the Blue/Green deployment process.
# Usage: .\watchscript.ps1 -Target http://<ALB_DNS_NAME>

param([Parameter(Mandatory = $true)][string]$Target)

while ($true) {
    $time = Get-Date -Format 'HH:mm:ss'
    try {
        $sw = [System.Diagnostics.Stopwatch]::StartNew()
        $resp = Invoke-WebRequest -Uri $Target -UseBasicParsing -TimeoutSec 5
        $sw.Stop()
        $status = "$($resp.StatusCode) $([math]::Round($sw.Elapsed.TotalSeconds,3))s"
    } catch {
        $status = "ERROR $($_.Exception.Message)"
    }

    $ami = 'n/a'
    try {
        $details = Invoke-WebRequest -Uri "$Target/details.php" -UseBasicParsing -TimeoutSec 5
        $m = [regex]::Match($details.Content, 'ami-[0-9a-f]{8,}')
        if ($m.Success) { $ami = $m.Value }
    } catch { }

    Write-Output "$time  StatusCode=$status  AMI=$ami"
    Start-Sleep -Seconds 2
}
Run the script with the Load Balancer’s DNS name:
$ALB = aws cloudformation describe-stacks --stack-name pattern3-app --region ap-southeast-2 --query "Stacks[0].Outputs[?OutputKey=='OutputPattern3ALBDNSName'].OutputValue" --output text

.\watchscript.ps1 -Target "http://$ALB"
If PowerShell refuses to run the script, allow it in the scope of the current session:
Set-ExecutionPolicy -Scope Process -ExecutionPolicy Bypass
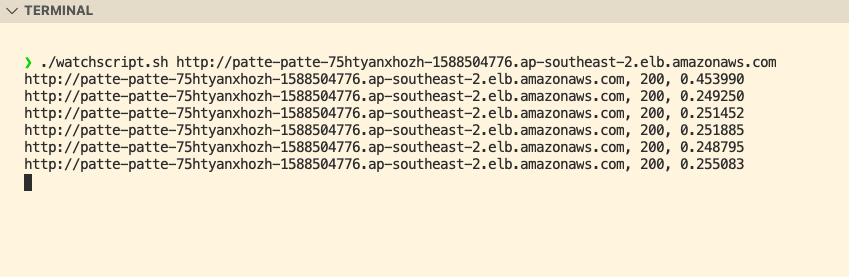
The script will continuously send requests and print the StatusCode along with the serving AMI ID. Thanks to this, you can see the exact moment the AMI is swapped, and more importantly, confirm whether the application experiences downtime or not.
Execute Automation Document
Once the Monitoring Script is running, we proceed to execute the Automation Document. You can choose one of the two methods below.
Method 1: via AWS Console
- In the left navigation pane, under Change Management Tools, select Automation.
- Click the
Execute runbookbutton. - In the Owned by me tab, select
pattern3-automate-CreateImageand click Next. - The Execute automation runbook page opens. For the execution mode, keep
Simple execution. - In the Runbook details section, leave
Runbook versionas$DEFAULT. - In the Input parameters section, fill in:
ImageBuilderPipeline: if this parameter has a default value, the field will be pre-filled with the pipeline ARN. If empty, paste your pipeline ARN into it.ApplicationStack: enterpattern3-app.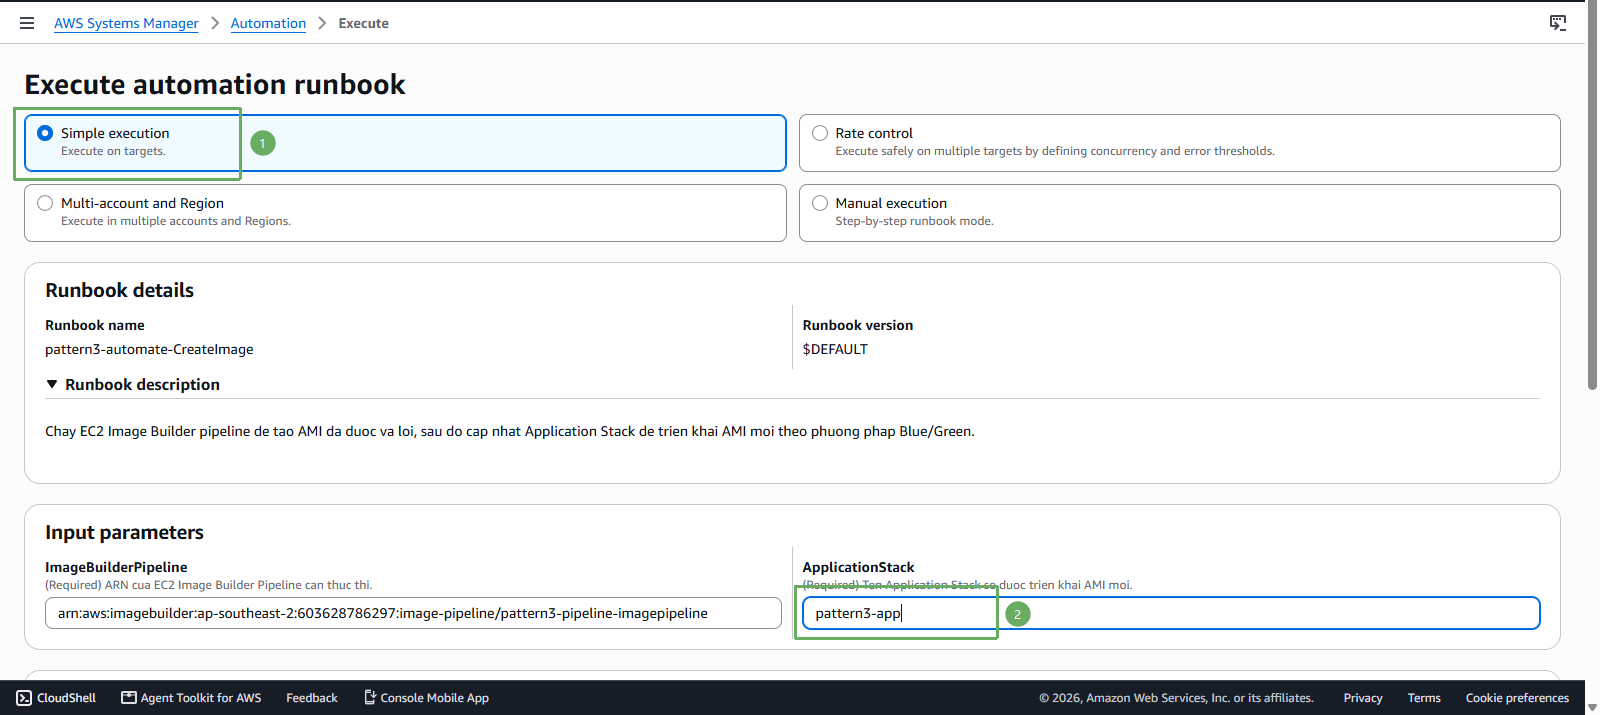
- Click the
Executebutton at the bottom of the page. - The Console switches to the execution details page. Track the progress in the Executed steps section, where each step will sequentially transition from
PendingtoInProgressand thenSuccess.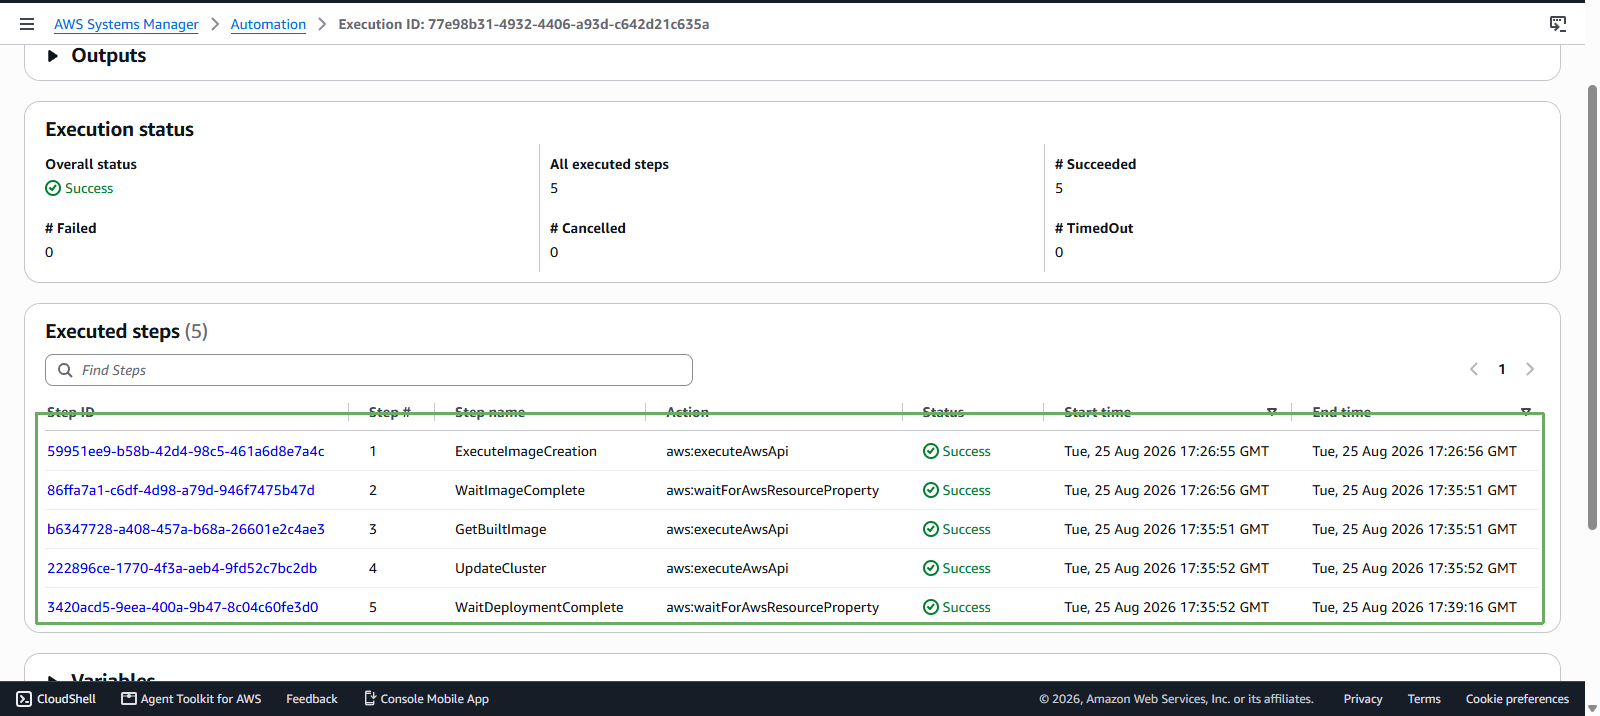
The execution page features four modes; this lab uses the first mode:
| Mode | When to use |
|---|---|
| Simple execution | Run once on a single target. This is the mode we need |
| Rate control | Run across multiple targets, with concurrency control and error thresholds |
| Multi-account and Region | Run concurrently across multiple accounts and Regions |
| Manual execution | Step-by-step execution, requiring manual confirmation for each step. Useful for debugging |
The ApplicationStack field is often left blank, especially when you created the runbook manually, since its default value is only generated when deployed via CloudFormation. If left blank and you hit Execute, the UpdateCluster step will fail because it doesn’t know which Stack to update. Please enter pattern3-app.
Method 2: via AWS CLI
# Get the name of the runbook owned by yourself. The lab only has one, so fetch the first item.
DOC_NAME=$(aws ssm list-documents --filters Key=Owner,Values=Self Key=DocumentType,Values=Automation --region ap-southeast-2 --query "DocumentIdentifiers[0].Name" --output text)
echo "Runbook: $DOC_NAME"

EXECUTION_ID=$(aws ssm start-automation-execution --document-name "$DOC_NAME" --parameters "ApplicationStack=pattern3-app" --region ap-southeast-2 --query "AutomationExecutionId" --output text)
echo "AutomationExecutionId: $EXECUTION_ID"
If your runbook does not have a default value for ImageBuilderPipeline, you need to pass both parameters. Be sure to retrieve the ARN into a variable instead of pasting a dummy string:
PIPELINE_ARN=$(aws imagebuilder list-image-pipelines --region ap-southeast-2 --query "imagePipelineList[?name=='pattern3-pipeline-ImagePipeline'].arn | [0]" --output text)

aws ssm start-automation-execution --document-name "$DOC_NAME" --parameters "ApplicationStack=pattern3-app,ImageBuilderPipeline=$PIPELINE_ARN" --region ap-southeast-2
# Get the name of the runbook owned by yourself. The lab only has one, so fetch the first item.
$DOC_NAME = aws ssm list-documents --filters Key=Owner,Values=Self Key=DocumentType,Values=Automation --region ap-southeast-2 --query "DocumentIdentifiers[0].Name" --output text
Write-Output "Runbook: $DOC_NAME"

$EXECUTION_ID = aws ssm start-automation-execution --document-name "$DOC_NAME" --parameters "ApplicationStack=pattern3-app" --region ap-southeast-2 --query "AutomationExecutionId" --output text
Write-Output "AutomationExecutionId: $EXECUTION_ID"
If your runbook does not have a default value for ImageBuilderPipeline, you need to pass both parameters. Be sure to retrieve the ARN into a variable instead of pasting a dummy string:
$PIPELINE_ARN = aws imagebuilder list-image-pipelines --region ap-southeast-2 --query "imagePipelineList[?name=='pattern3-pipeline-ImagePipeline'].arn | [0]" --output text

aws ssm start-automation-execution --document-name "$DOC_NAME" --parameters "ApplicationStack=pattern3-app,ImageBuilderPipeline=$PIPELINE_ARN" --region ap-southeast-2
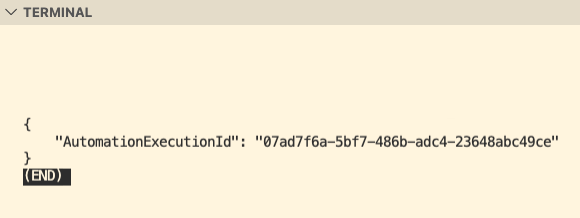
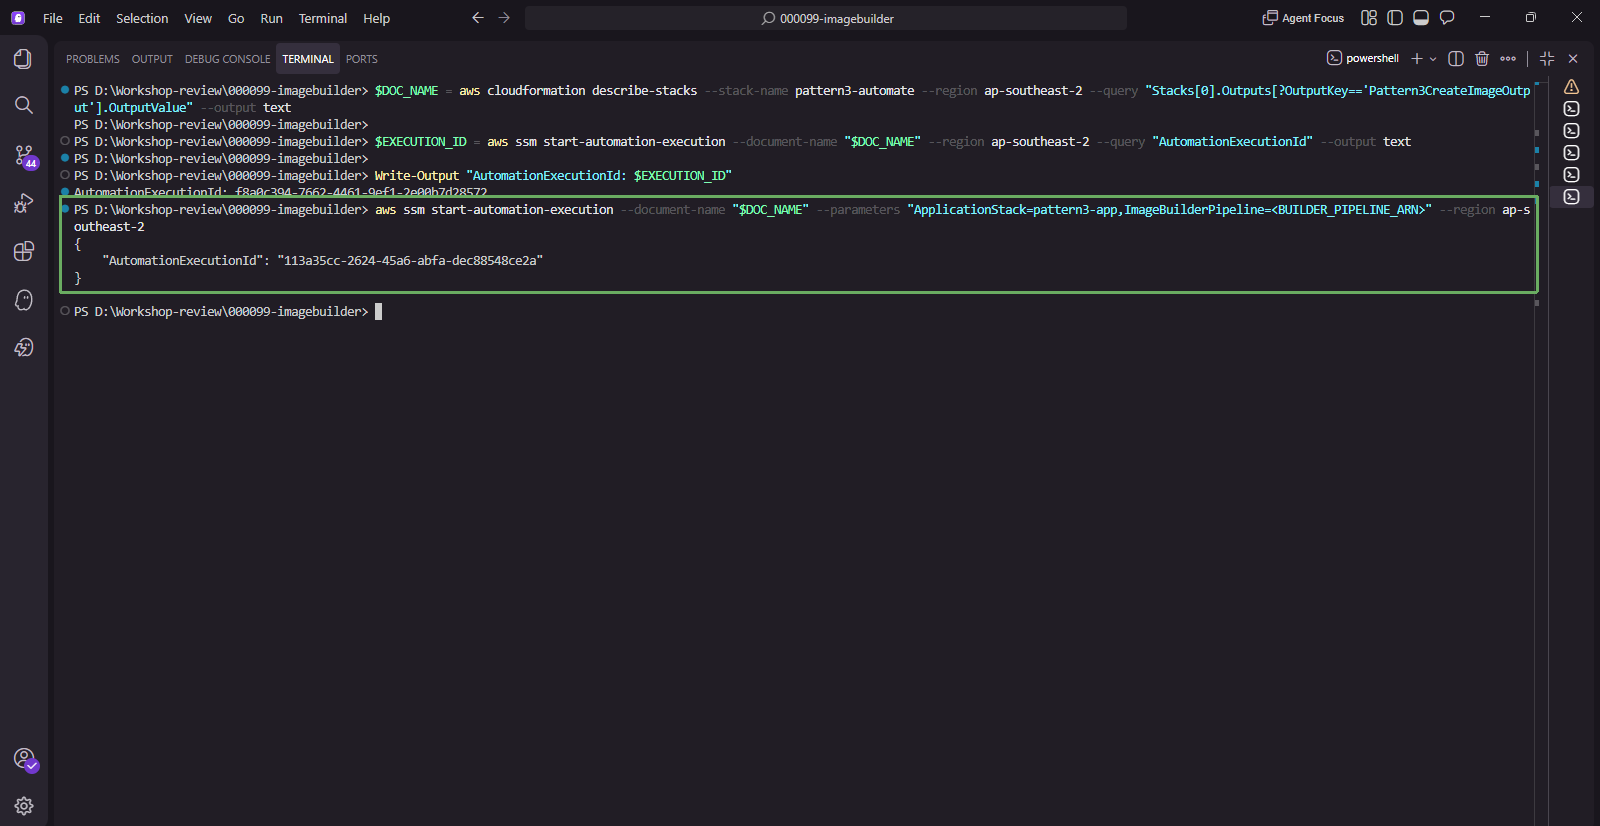
Check the status of the Automation Document. The syntax is identical in both shells, except for how the
$EXECUTION_IDvariable was declared in the previous step.aws ssm get-automation-execution --automation-execution-id "$EXECUTION_ID" --region ap-southeast-2 --query "AutomationExecution.{Status:AutomationExecutionStatus,CurrentStep:CurrentStepName}" --output tableAlternatively, view the list of executions:
aws ssm describe-automation-executions --filters "Key=ExecutionId,Values=$EXECUTION_ID" --region ap-southeast-2 --query "AutomationExecutionMetadataList[0]" --output json
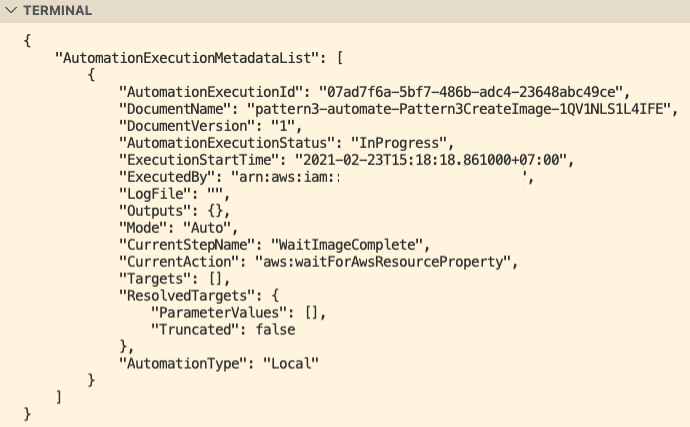
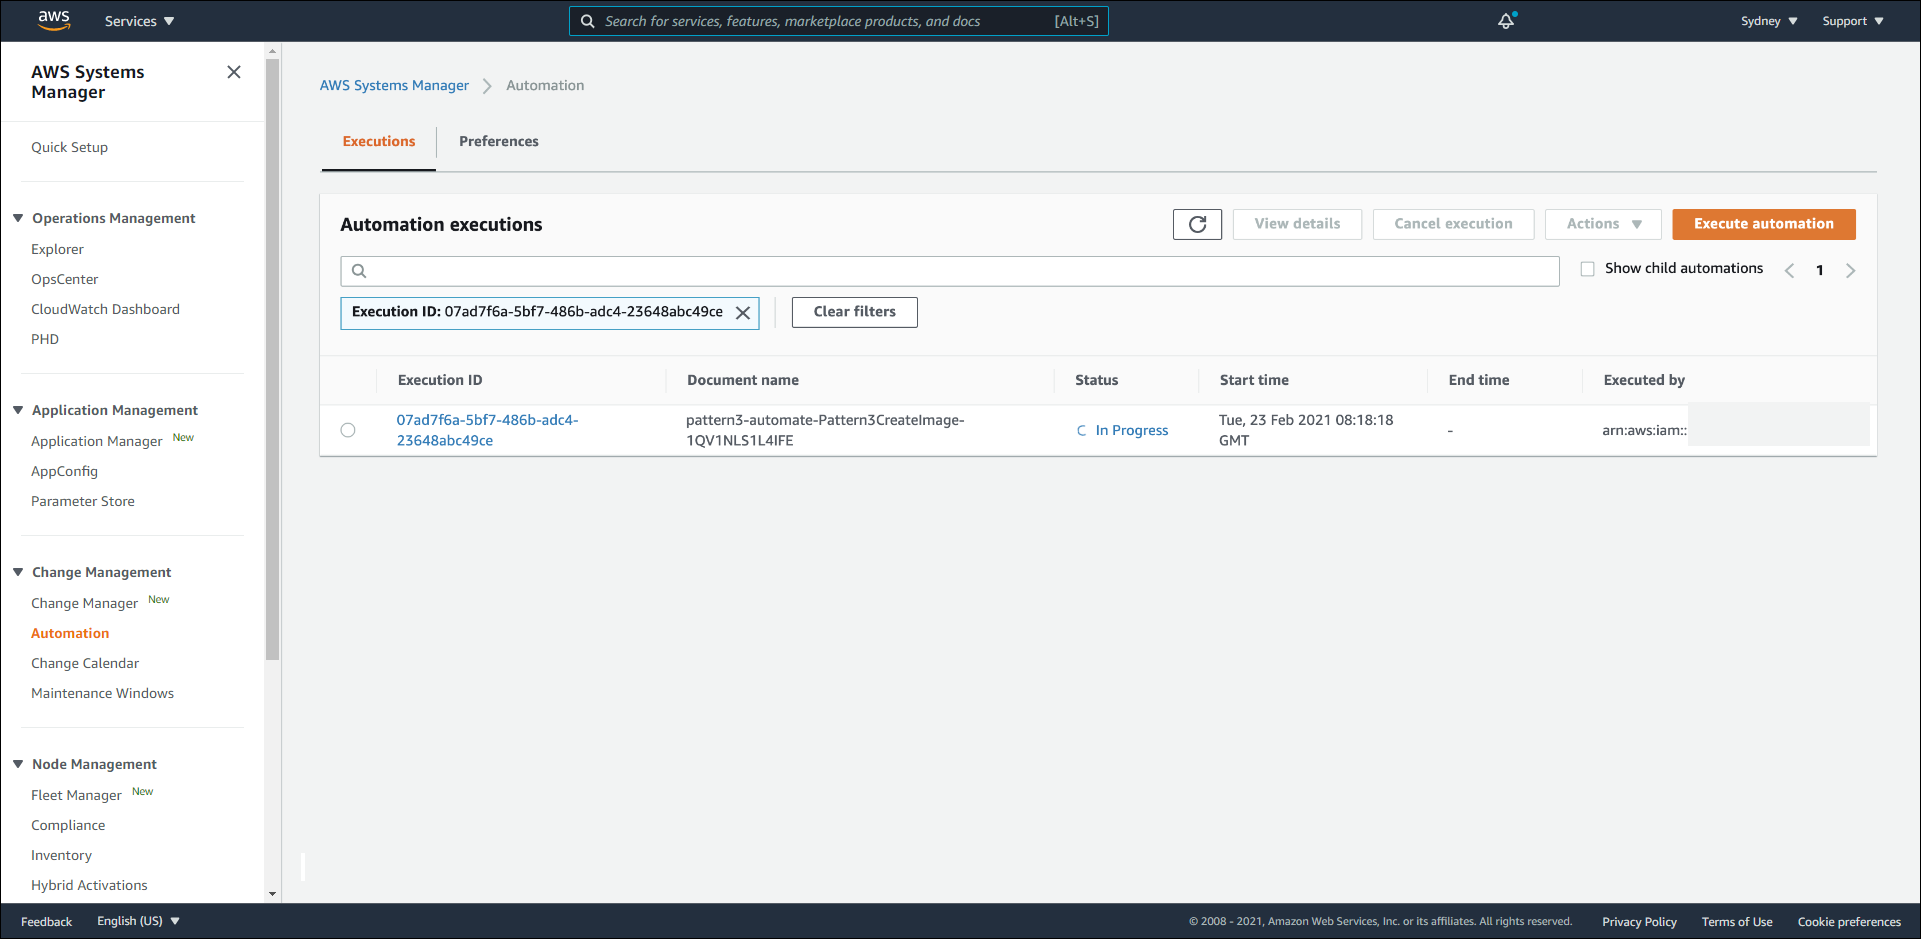
From the AWS Console, we can monitor each step and its status:
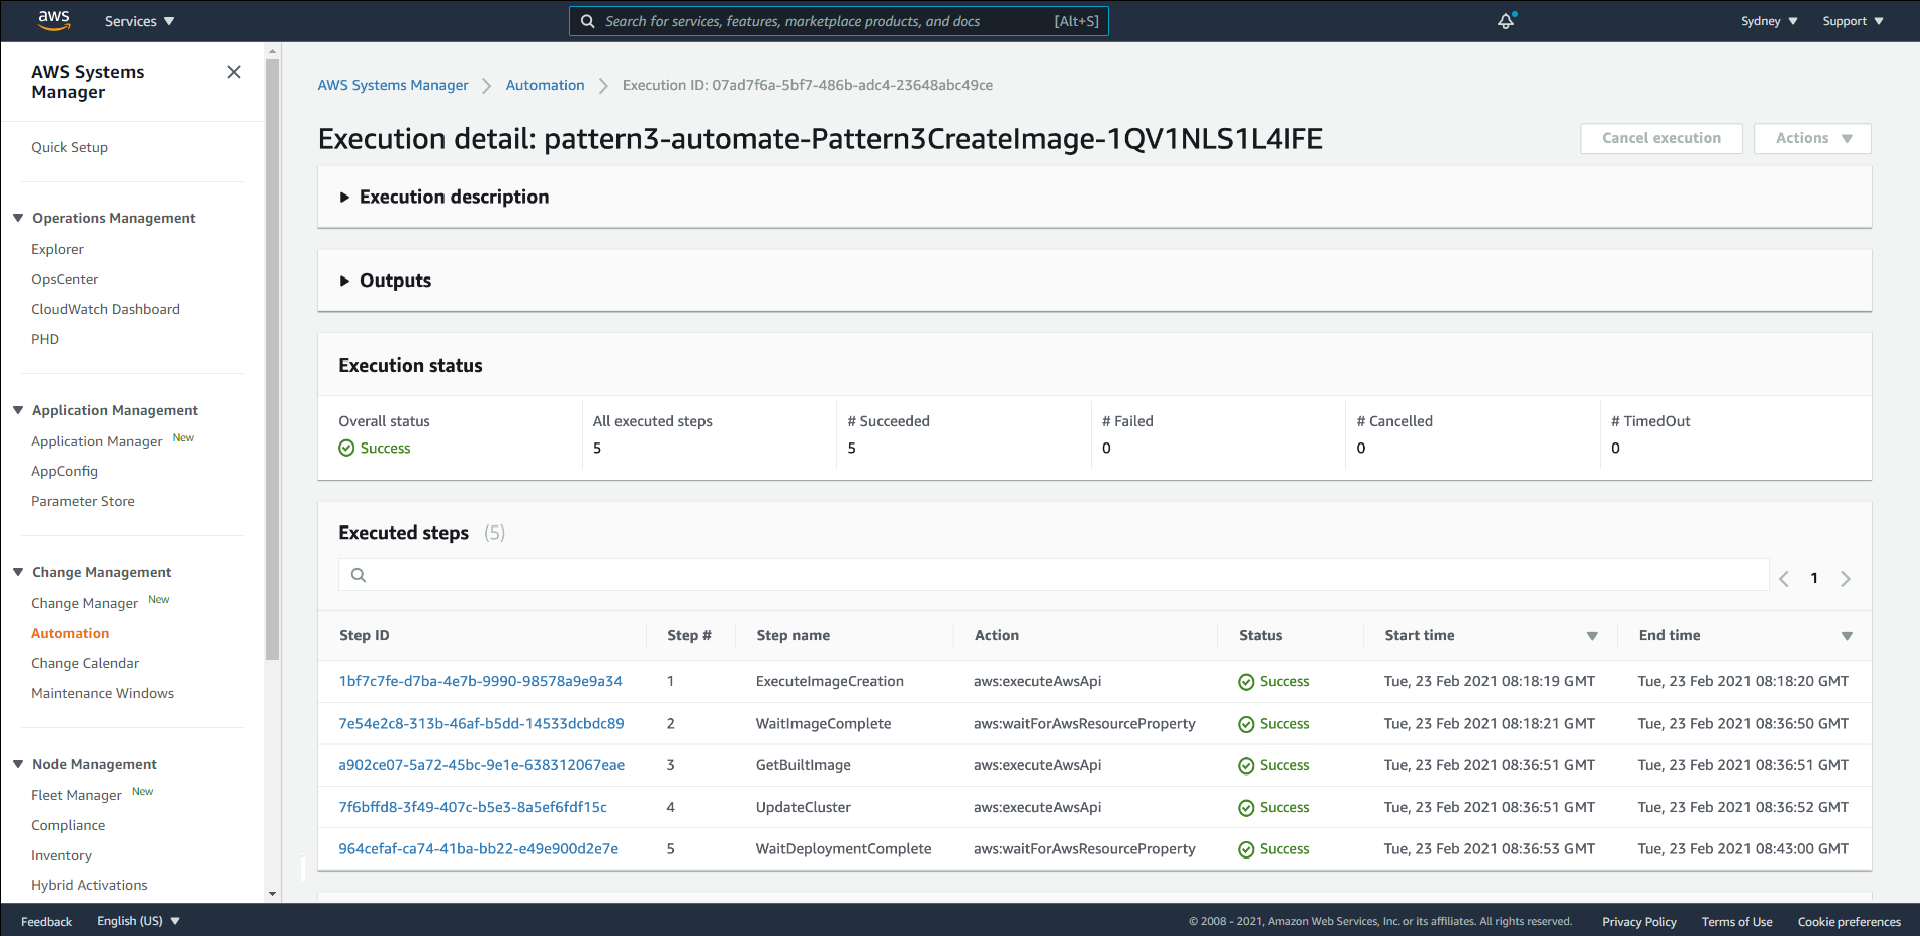
The entire process takes about 30 to 45 minutes, of which the WaitImageComplete step consumes most of the time. While waiting, observe the terminal running watchscript.sh: the StatusCode should constantly remain 200 throughout, even at the exact moment the Auto Scaling Group is being replaced. This is the value provided by AutoScalingReplacingUpdate.
Verify AMI ID
We will proceed to verify whether the new AMI ID has been updated or not by accessing the DNS URL of the Application Load Balancer, and appending /details.php.
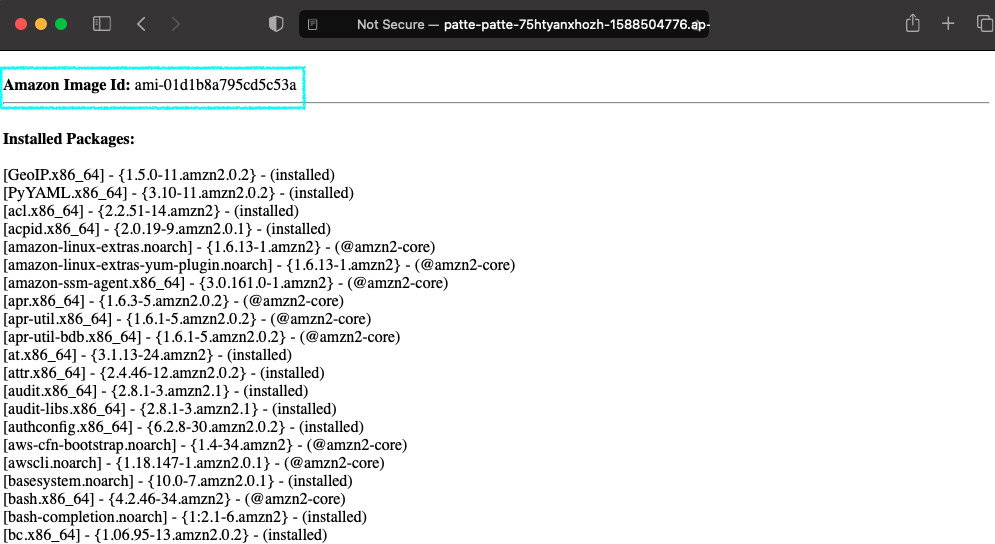
Cross-reference this with the values you saved in section 3:
- Amazon Image Id must be a different value, pointing to the AMI just built by Image Builder.
- Installed Packages will typically have a different count or newer version numbers, reflecting the newly installed patches.
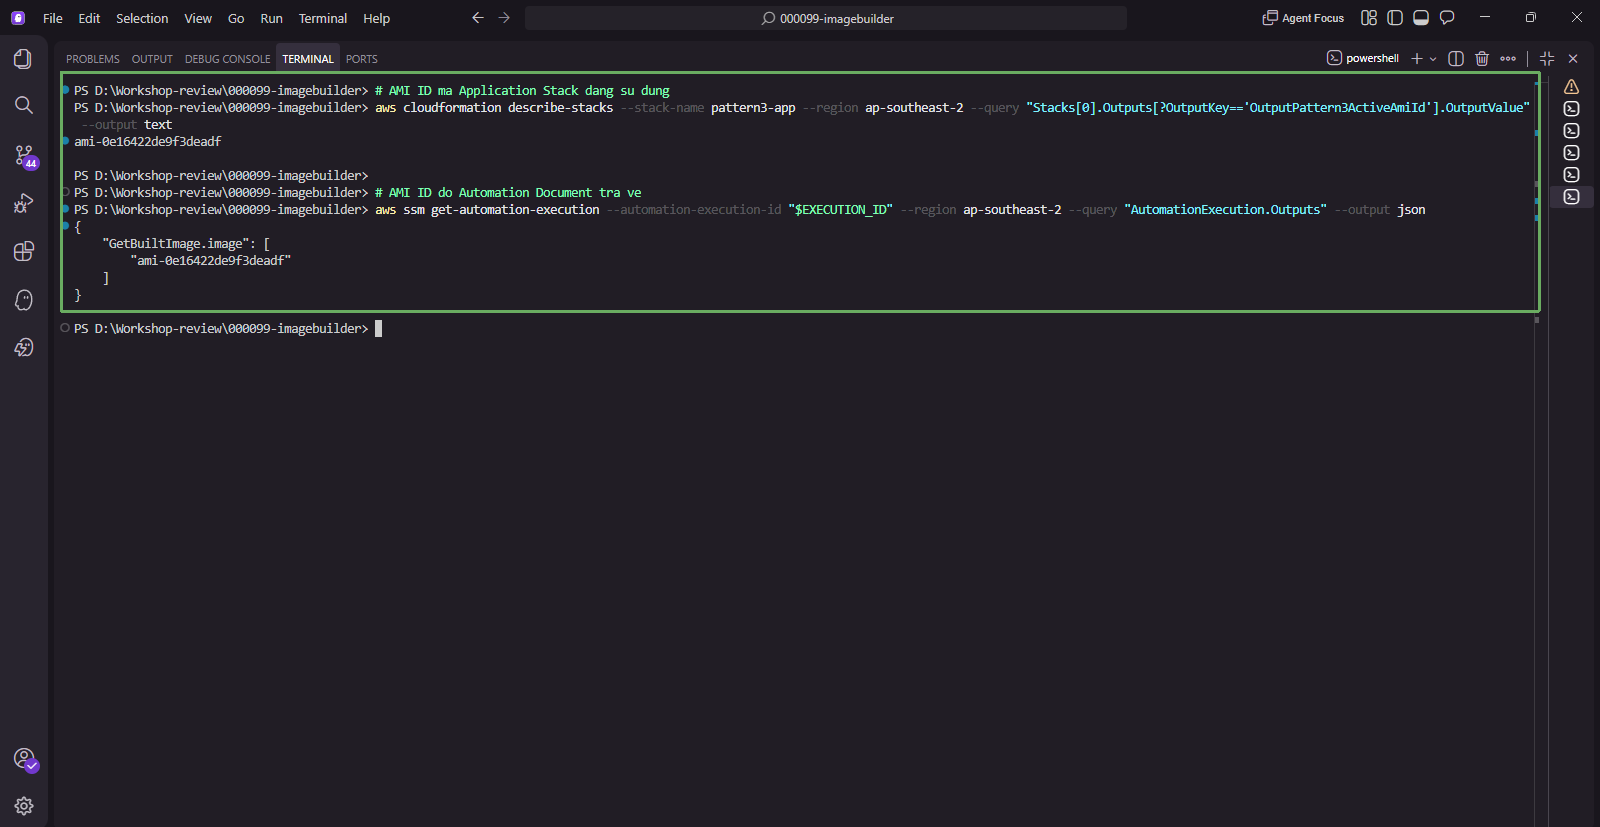
Quick check via CLI:
# The AMI ID currently used by the Application Stack
aws cloudformation describe-stacks --stack-name pattern3-app --region ap-southeast-2 --query "Stacks[0].Outputs[?OutputKey=='OutputPattern3ActiveAmiId'].OutputValue" --output text

# The AMI ID returned by the Automation Document
aws ssm get-automation-execution --automation-execution-id "$EXECUTION_ID" --region ap-southeast-2 --query "AutomationExecution.Outputs" --output json
These two values must be identical.
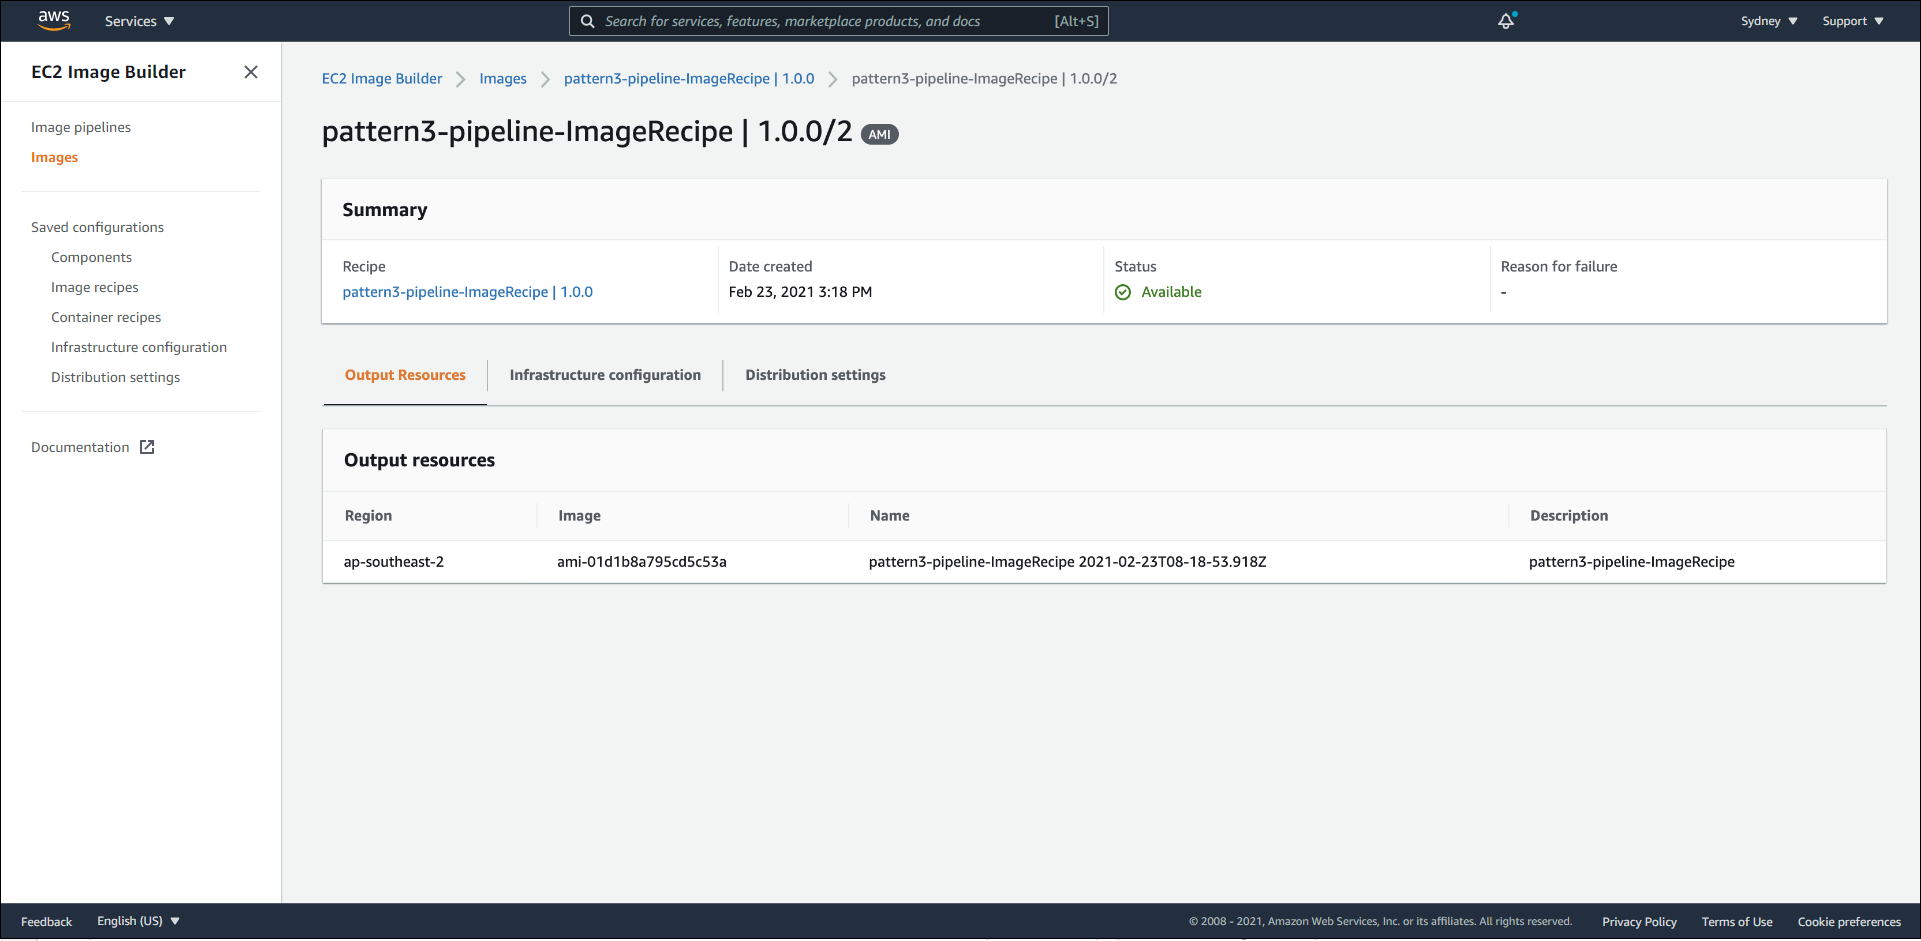
At Step 1: ExecuteImageCreation, in the Outputs section, we can obtain the Pipeline Execution ARN.
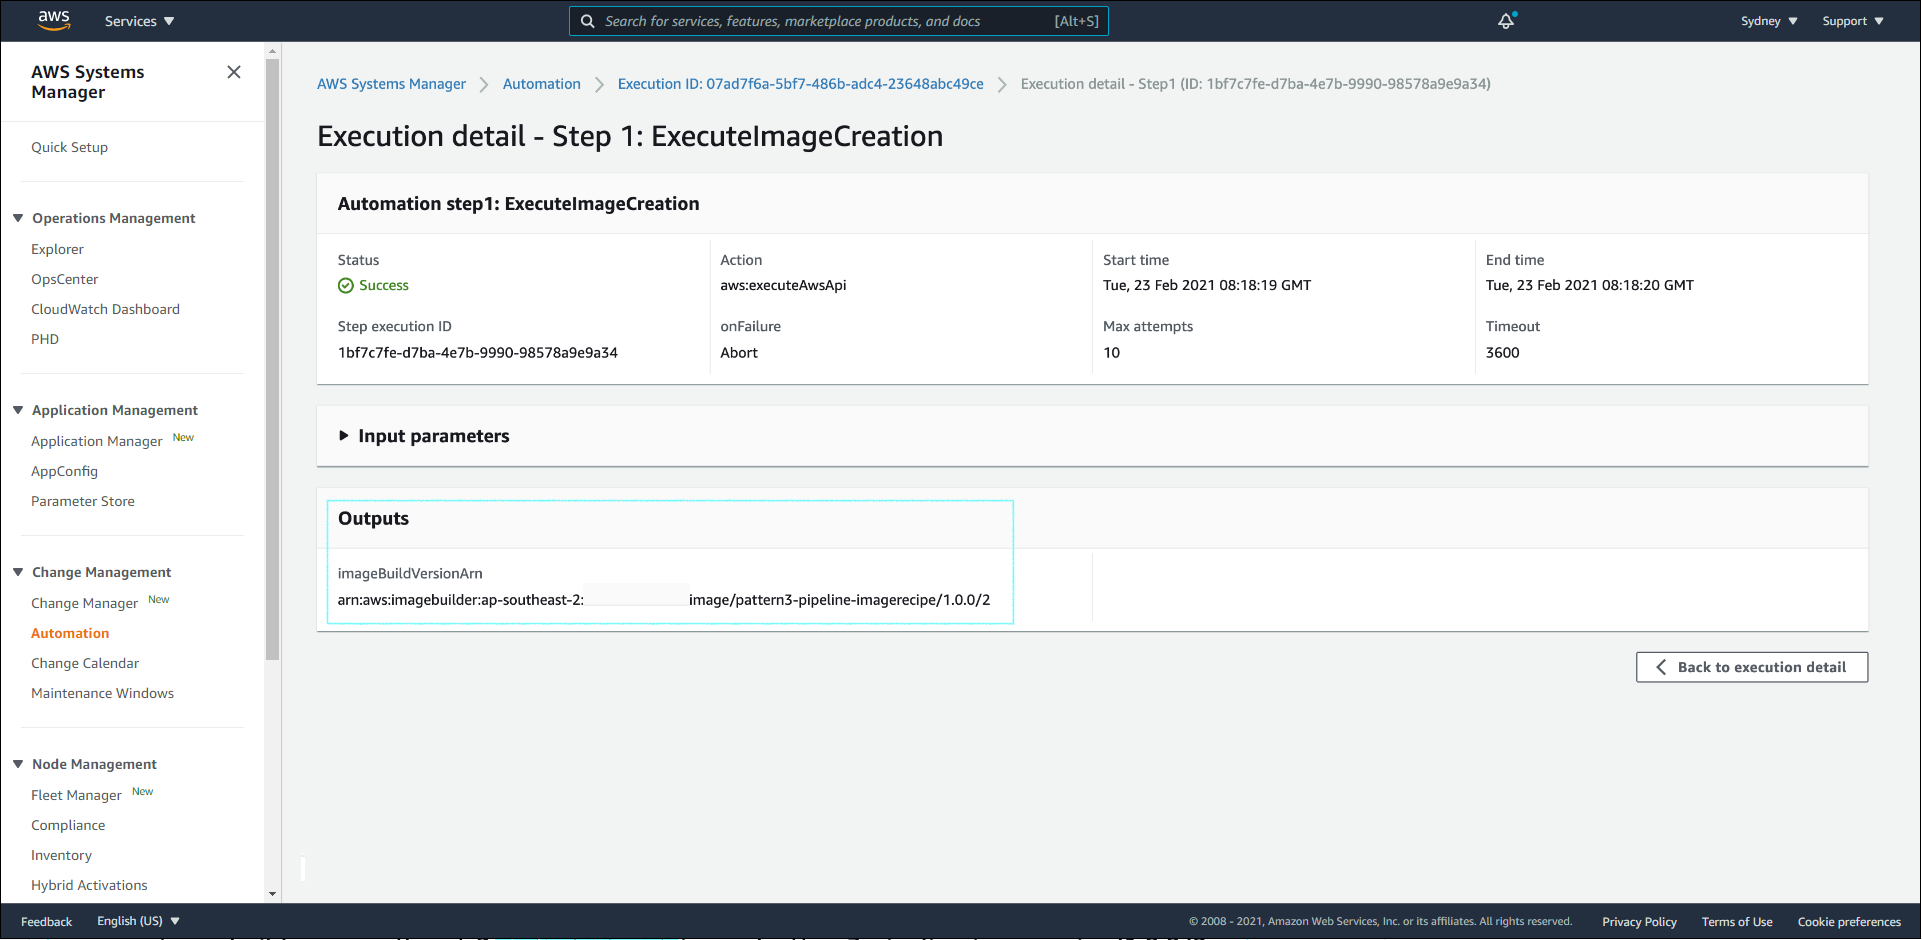
Subsequently, we can cross-reference it with the value in the EC2 Image Builder service.
Finally, stop watchscript.sh by pressing Ctrl + C and move on to the Resource Cleanup section.