Tự động hoá với SSM
Triển khai Tự động hoá với SSM
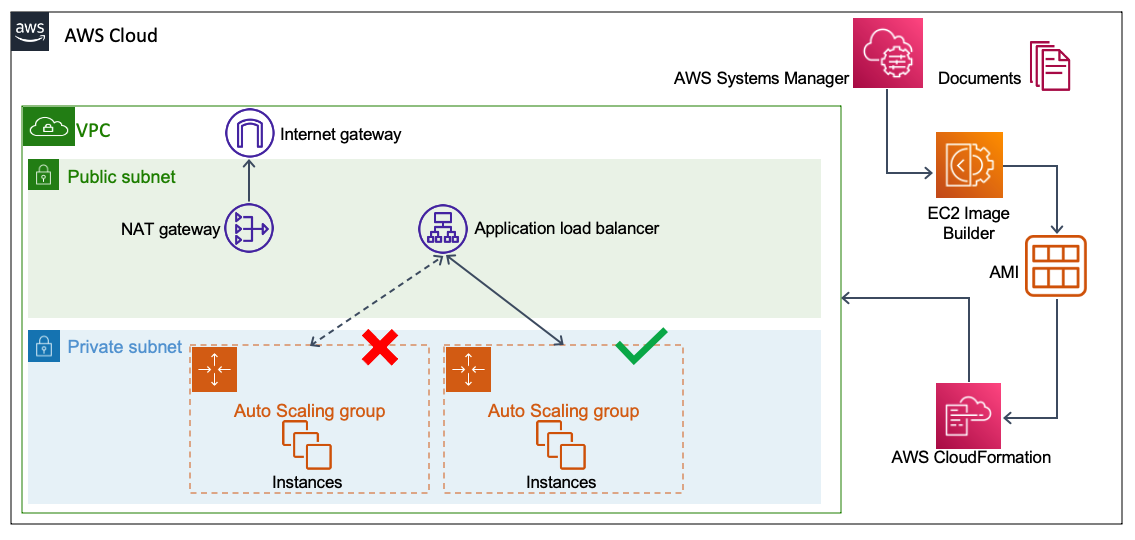
Sau khi đã hoàn thành Builder Pipeline ở phần trước, chúng ta sẽ tiến đến giai đoạn tự động hoá triển khai với dịch vụ Systems Manager. Với mục tiêu triển khai AMI mới đã hoàn thành OS Patching cho hạ tầng ứng dụng hiện tại, chúng ta sẽ sử dụng Automation Document.
Với Automation Document, những hoạt động sau sẽ lần lượt được thực thi:
- Tự động thực thi Builder Pipeline.
- Đợi AMI mới đã hoàn thành OS Patching được tạo xong.
- Cập nhật CloudFormation Stack của ứng dụng với giá trị AMI mới.
- Tự động kích hoạt chính sách
AutoScalingReplacingUpdatenhằm triển khai phương pháp Blue/Green Deployment cho Auto Scaling Group.
Với cách tiếp cận này, chúng ta sẽ giảm thiểu tối đa tổng thời gian từ khởi tạo AMI cho đến cập nhật hạ tầng ứng dụng, điều này cực kỳ hữu ích và tránh gián đoạn đến trải nghiệm người dùng.
Bên cạnh đó, điểm mấu chốt của quá trình tự động hoá này chính là chính sách AutoScalingReplacingUpdate nhằm đơn giản hoá tính phức tạp nếu triển khai phương pháp Blue/Green Deployment một cách thủ công. Để dễ dàng hình dung hơn, chúng ta sẽ xem xét quá trình sau:
- Đầu tiên, tham số
AmazonMachineImagecủa Stackpattern3-appđược cập nhật bằng AMI ID mới, khiến CloudFormation tạo ra một version mới của Launch Template. - Vì Auto Scaling Group tham chiếu tới
LatestVersionNumbercủa Launch Template, CloudFormation nhận biết đây là thay đổi cần thay thế và tiến hành tạo một Auto Scaling Group mới dùng AMI đã được vá lỗi. - CloudFormation đợi cho đến khi các EC2 instances mới gửi tín hiệu
cfn-signalvà được Load Balancer đánh giáHealth ChecklàHealthy.- Khi kết quả là
Healthy, CloudFormation chuyển lưu lượng sang Auto Scaling Group mới và xoá Auto Scaling Group cũ. - Khi kết quả là
Unhealthy, CloudFormation tiến hành quay ngược quá trình cập nhật và giữ nguyên tài nguyên hiện tại.
- Khi kết quả là
CloudFormation Stack
Để tiến hành triển khai hạ tầng, chúng ta sẽ sử dụng dịch vụ AWS CloudFormation thông qua AWS Console hoặc AWS CLI.
| Thành Phần | Giá Trị (Bắt buộc) |
|---|---|
| Stack Name | pattern3-automate |
| Template | pattern3-automate.yml - tải ở mục Template bên dưới |
| ImageBuilderPipelineStack | pattern3-pipeline |
| ApplicationStack | pattern3-app |
Bạn hãy tải template ở đây:
AWS CLI
Sau đây là các bước khởi tạo thông qua AWS CLI:
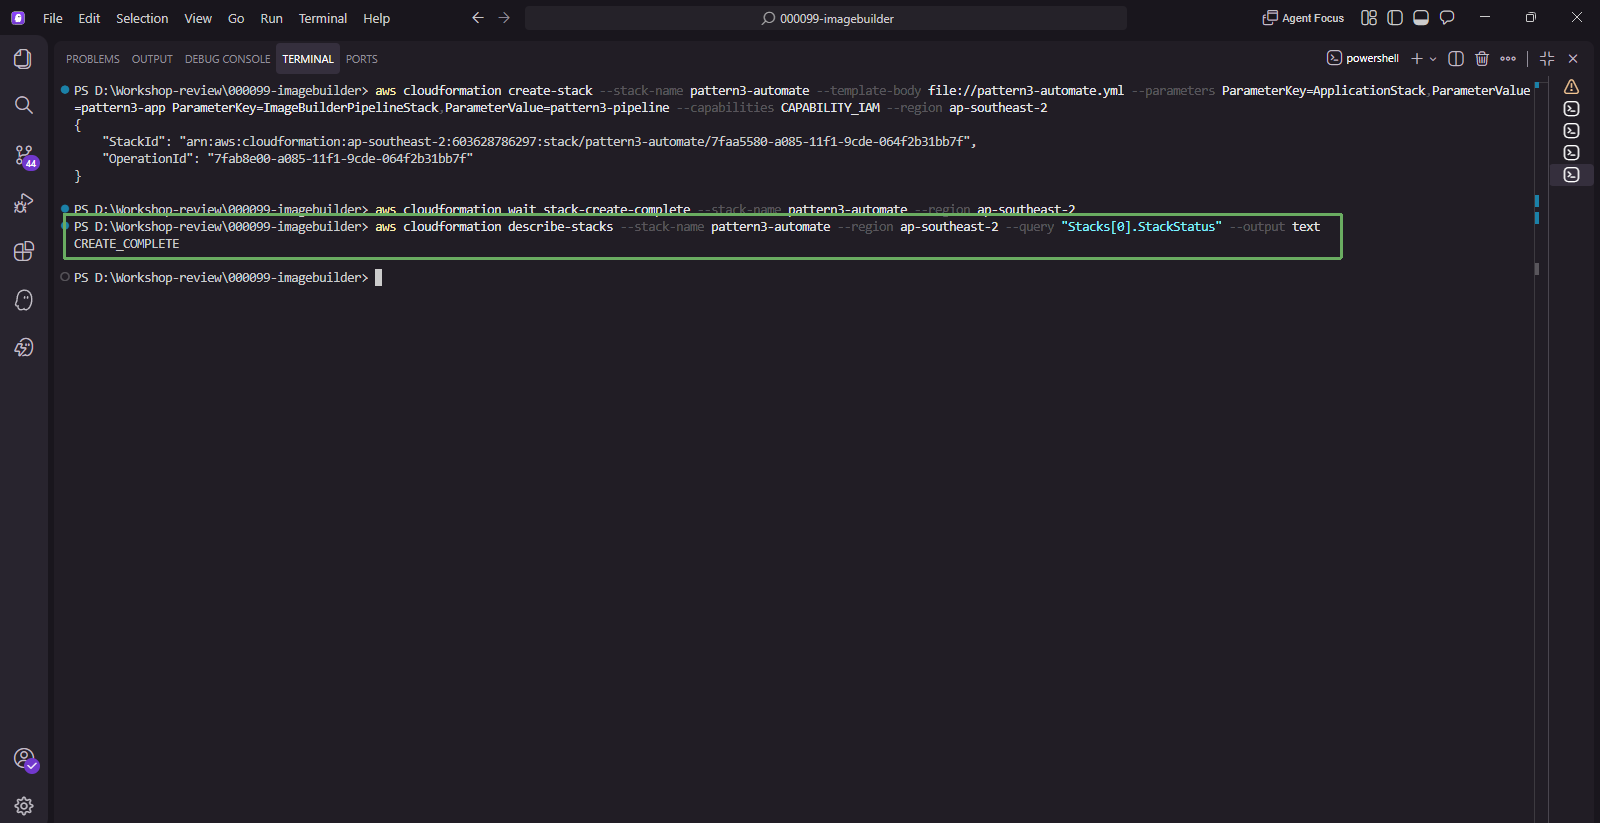
- Khởi tạo CloudFormation Stack
aws cloudformation create-stack --stack-name pattern3-automate --template-body file://pattern3-automate.yml --parameters ParameterKey=ApplicationStack,ParameterValue=pattern3-app ParameterKey=ImageBuilderPipelineStack,ParameterValue=pattern3-pipeline --capabilities CAPABILITY_IAM --region ap-southeast-2

Chờ Stack khởi tạo xong, bước này chỉ mất khoảng 1 phút.
aws cloudformation wait stack-create-complete --stack-name pattern3-automate --region ap-southeast-2Xác nhận CloudFormation Stack đã khởi tạo hoàn tất với StackStatus là
CREATE_COMPLETE.aws cloudformation describe-stacks --stack-name pattern3-automate --region ap-southeast-2 --query "Stacks[0].StackStatus" --output text
- Ghi chú lại tên của Automation Document tại Output.
aws cloudformation describe-stacks --stack-name pattern3-automate --region ap-southeast-2 --query "Stacks[0].Outputs" --output table
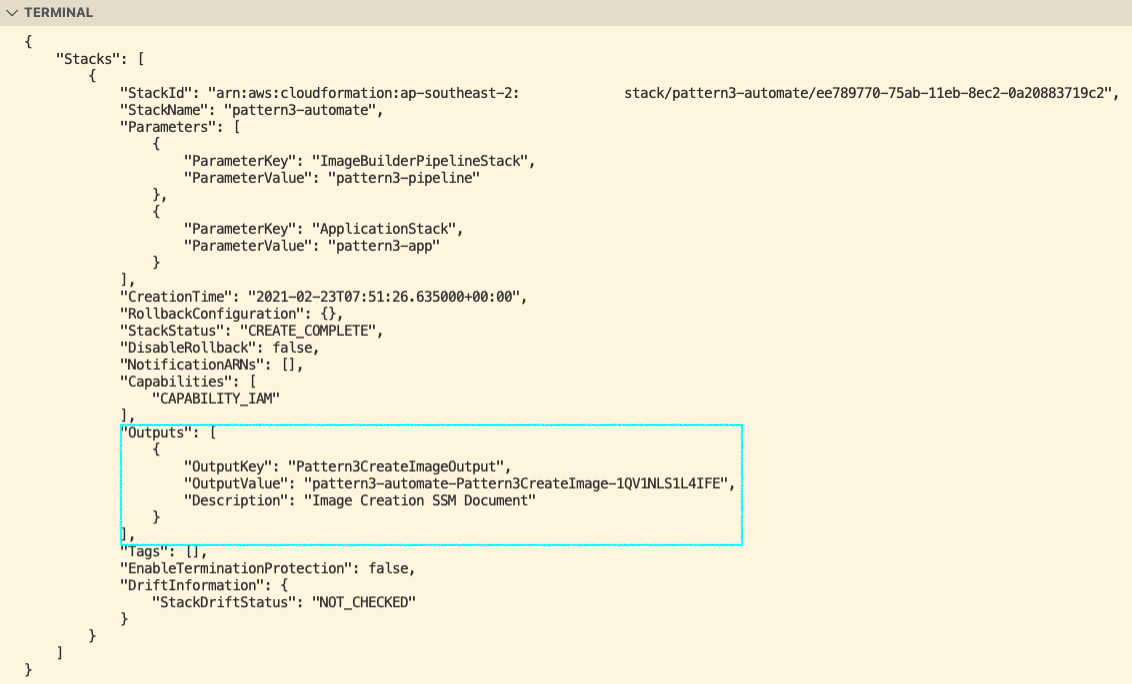
Đến đây, Automation Document đã được tạo xong. Stack pattern3-automate chỉ tạo duy nhất một tài nguyên AWS::SSM::Document, và tên của document nằm ở Output Pattern3CreateImageOutput.
Nếu bạn đã triển khai bằng CloudFormation, có thể bỏ qua mục Các Bước Khởi Tạo Thủ Công bên dưới và đi thẳng tới Chuẩn bị Monitoring Script. Tuy vậy, mục Chi Tiết Đặc Tả thì bạn nên đọc, vì đó là phần giải thích logic của toàn bộ quy trình tự động hoá.
Chuẩn bị Automation Document
Mục này có hai phần. Bạn chỉ cần làm một trong hai cách để có Automation Document:
| Cách | Khi nào dùng |
|---|---|
CloudFormation Stack pattern3-automate ở mục trên | Nhanh, ít sai sót, khuyến nghị dùng |
| Tự tạo từ Console theo các bước dưới đây | Khi bạn muốn nhìn thấy từng bước thao tác |
Các Bước Khởi Tạo Thủ Công
Chỉ làm phần này nếu bạn không triển khai Stack pattern3-automate ở mục trên:
- Truy cập vào dịch vụ Systems Manager.
- Ở thanh điều hướng bên tay trái, trong nhóm Change Management Tools, chọn Documents.
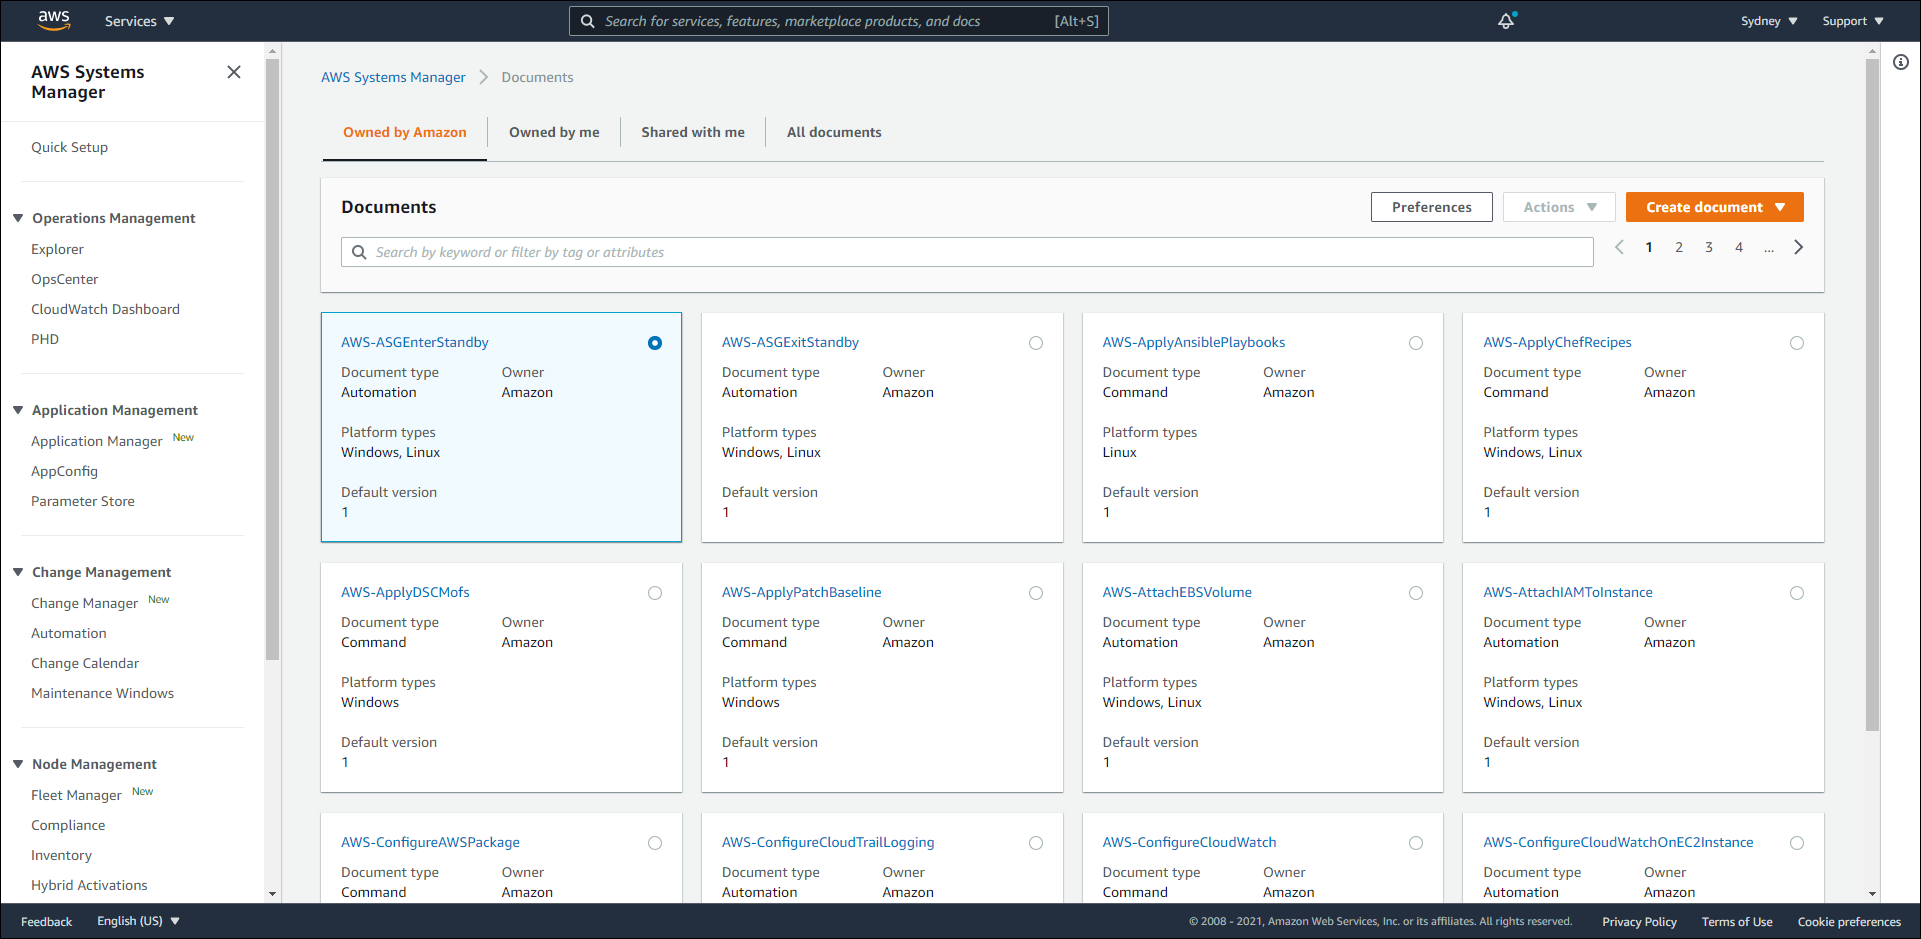
Ở góc trên bên phải của khung Documents, nhấn nút màu cam
Create document, rồi chọnAutomationtrong danh sách thả xuống.Trang thiết kế runbook mở ra với tên mặc định là
NewRunbook. Nhấn vào biểu tượng bút chì cạnh tên đó và đổi thànhpattern3-automate-CreateImage.Ở thanh phía trên, chuyển từ chế độ
Designsang chế độ{} Code, và đảm bảo bộ chọn định dạng bên phải đang làYAML.Xoá nội dung mẫu trong khung soạn thảo, rồi dán toàn bộ đặc tả YAML ở mục Chi Tiết Đặc Tả ngay bên dưới.
Nhấn nút màu cam
Create runbookở góc trên bên phải. Document sẽ xuất hiện ở tab Owned by me của trang Documents.
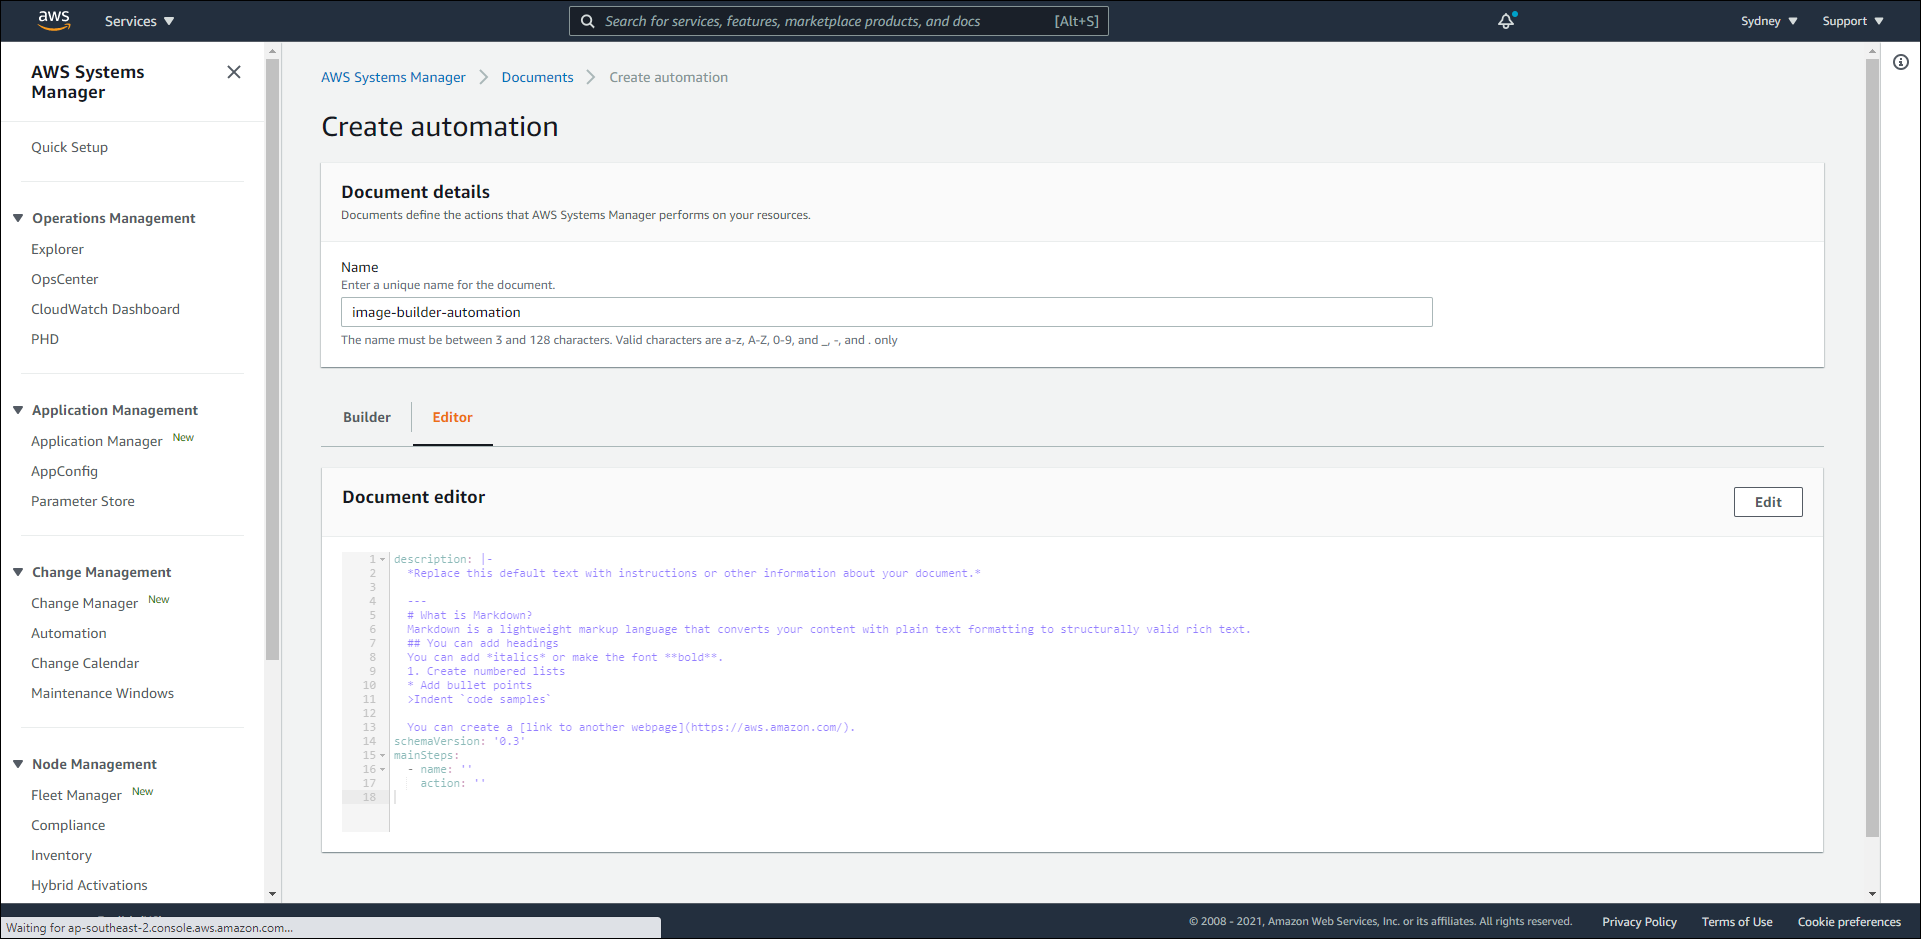
Khi tạo thủ công, hai tham số của runbook sẽ không có giá trị mặc định. Giá trị default trong file pattern3-automate.yml được sinh ra từ Fn::ImportValue của CloudFormation, nên không tồn tại ở đường thủ công.
Bạn có hai lựa chọn:
- Điền sẵn
defaultvào YAML trước khi dán, thay<ARN_PIPELINE_CUA_BAN>bằng ARN thật:parameters: ImageBuilderPipeline: default: <ARN_PIPELINE_CUA_BAN> description: (Required) ARN cua EC2 Image Builder Pipeline can thuc thi. type: String ApplicationStack: default: pattern3-app description: (Required) Ten Application Stack se duoc trien khai AMI moi. type: String - Hoặc để nguyên và truyền tham số mỗi lần chạy, dùng dạng lệnh tường minh ở mục Thực thi Automation Document.
Lấy ARN pipeline bằng lệnh sau:
aws imagebuilder list-image-pipelines --region ap-southeast-2 --query "imagePipelineList[?name=='pattern3-pipeline-ImagePipeline'].arn | [0]" --output text
Cách nhanh hơn nếu bạn thấy trình thiết kế rườm rà. Lưu đặc tả YAML ở mục Chi Tiết Đặc Tả thành file createimage.yml, rồi tạo document bằng một lệnh duy nhất:
aws ssm create-document --name pattern3-automate-CreateImage --document-type Automation --document-format YAML --content file://createimage.yml --region ap-southeast-2
Kiểm tra kết quả:
aws ssm describe-document --name pattern3-automate-CreateImage --region ap-southeast-2 --query "Document.{Name:Name,Type:DocumentType,Status:Status}" --output table
Cách này không phụ thuộc vào giao diện Console, và nếu cần sửa đặc tả thì chỉ việc sửa file rồi chạy aws ssm update-document.
Chi Tiết Đặc Tả
Đây là toàn bộ đặc tả của Automation Document, và là phần đáng đọc nhất của chương này bất kể bạn chọn cách nào:
- Nếu tạo thủ công, bạn dán đoạn YAML dưới đây vào
Editorcủa Console. - Nếu dùng CloudFormation, đoạn YAML này chính là nội dung nằm trong khoá
Contentcủa tài nguyênAWS::SSM::Documenttrong filepattern3-automate.yml. Nói cách khác, CloudFormation chỉ là cái vỏ để đăng ký document, còn logic thật nằm ở đây.
Cách hoạt động:
- Đầu tiên chúng ta xác định
schemaVersionvà định nghĩa cácparameters.ImageBuilderPipeline: ARN của Builder Pipeline mà chúng ta đã tạo ở phần trước.ApplicationStack: tên CloudFormation Stack của ứng dụng -pattern3-app.
- Kế đến là đặc tả
mainSteps. Bằng việc sử dụng các giá trị củaparameters, chúng ta tạo hành động tên là ExecuteImageCreation thông quaaws:executeAwsApi. - Sau đó, chúng ta cần đợi cho đến khi AMI được build xong với
aws:waitForAwsResourceProperty. Đây là bước lâu nhất, khoảng 20 đến 30 phút. - Một khi AMI đã ở trạng thái
AVAILABLE, hành động GetBuiltImage sẽ lấy ra AMI ID và truyền giá trị này đến bước kế tiếp. - Sau khi có được AMI ID, hành động UpdateCluster tiến hành cập nhật CloudFormation Stack của ứng dụng.
- Cuối cùng, đợi cho tới khi quá trình cập nhật hoàn tất với trạng thái
UPDATE_COMPLETE.
description: >-
  Chay EC2 Image Builder pipeline de tao AMI da duoc va loi, sau do cap nhat
  Application Stack de trien khai AMI moi theo phuong phap Blue/Green.
schemaVersion: '0.3'
parameters:
  ImageBuilderPipeline:
    description: (Required) ARN cua EC2 Image Builder Pipeline can thuc thi.
    type: String
  ApplicationStack:
    description: (Required) Ten Application Stack se duoc trien khai AMI moi.
    type: String
outputs:
  - GetBuiltImage.image
mainSteps:
  - name: ExecuteImageCreation
    action: aws:executeAwsApi
    maxAttempts: 3
    timeoutSeconds: 600
    onFailure: Abort
    inputs:
      Service: imagebuilder
      Api: StartImagePipelineExecution
      imagePipelineArn: '{{ ImageBuilderPipeline }}'
    outputs:
      - Name: imageBuildVersionArn
        Selector: $.imageBuildVersionArn
        Type: String

  - name: WaitImageComplete
    action: aws:waitForAwsResourceProperty
    maxAttempts: 3
    timeoutSeconds: 5400
    onFailure: Abort
    inputs:
      Service: imagebuilder
      Api: GetImage
      imageBuildVersionArn: '{{ ExecuteImageCreation.imageBuildVersionArn }}'
      PropertySelector: image.state.status
      DesiredValues:
        - AVAILABLE

  - name: GetBuiltImage
    action: aws:executeAwsApi
    maxAttempts: 3
    timeoutSeconds: 600
    onFailure: Abort
    inputs:
      Service: imagebuilder
      Api: GetImage
      imageBuildVersionArn: '{{ ExecuteImageCreation.imageBuildVersionArn }}'
    outputs:
      - Name: image
        Selector: $.image.outputResources.amis[0].image
        Type: String

  - name: UpdateCluster
    action: aws:executeAwsApi
    maxAttempts: 3
    timeoutSeconds: 600
    onFailure: Abort
    inputs:
      Service: cloudformation
      Api: UpdateStack
      StackName: '{{ ApplicationStack }}'
      UsePreviousTemplate: true
      Parameters:
        - ParameterKey: BaselineVpcStack
          UsePreviousValue: true
        - ParameterKey: NumberOfInstanceCluster
          UsePreviousValue: true
        - ParameterKey: MaxNumberOfInstanceCluster
          UsePreviousValue: true
        - ParameterKey: InstanceType
          UsePreviousValue: true
        - ParameterKey: LatestAmiId
          UsePreviousValue: true
        - ParameterKey: AmazonMachineImage
          ParameterValue: '{{ GetBuiltImage.image }}'
      Capabilities:
        - CAPABILITY_IAM

  - name: WaitDeploymentComplete
    action: aws:waitForAwsResourceProperty
    maxAttempts: 3
    timeoutSeconds: 3600
    onFailure: Abort
    inputs:
      Service: cloudformation
      Api: DescribeStacks
      StackName: '{{ ApplicationStack }}'
      PropertySelector: Stacks[0].StackStatus
      DesiredValues:
        - UPDATE_COMPLETE
Bước UpdateCluster phải liệt kê đầy đủ các tham số của Application Stack kèm UsePreviousValue: true, trừ AmazonMachineImage là tham số chúng ta muốn thay đổi. Nguyên nhân là API UpdateStack sẽ đưa mọi tham số không được liệt kê về giá trị mặc định trong template, chứ không giữ lại giá trị hiện tại. Nếu bỏ sót, ví dụ Auto Scaling Group của bạn có thể bị đưa về số lượng instance mặc định.
Automation Document này không khai báo assumeRole, nên nó chạy bằng quyền của chính người thực thi. Danh tính bạn dùng cần có các quyền: imagebuilder:StartImagePipelineExecution, imagebuilder:GetImage, cloudformation:UpdateStack, cloudformation:DescribeStacks, cùng các quyền để CloudFormation cập nhật EC2, Auto Scaling và IAM. Trong môi trường thực tế, bạn nên tạo một Automation Service Role riêng và khai báo qua assumeRole để giới hạn phạm vi quyền.
Chuẩn bị Monitoring Script
Chúng ta tiến hành chuẩn bị một quá trình theo dõi cơ bản, liên tục gửi request đến đường dẫn URL của Application Load Balancer trước khi thực thi Automation Document. Khi đó, chúng ta có thể quan sát toàn bộ quá trình trước, trong và sau khi thay thế AMI.
Tạo file watchscript.sh với nội dung sau:
#!/bin/bash
# Theo doi tinh kha dung cua ung dung trong suot qua trinh Blue/Green deployment.
# Cach dung: ./watchscript.sh http://<ALB_DNS_NAME>

TARGET="$1"

if [ -z "$TARGET" ]; then
  echo "Cach dung: $0 http://<ALB_DNS_NAME>"
  exit 1
fi

while true; do
  RESULT=$(curl -s -o /dev/null -w "%{http_code} %{time_total}s" --max-time 5 "$TARGET")
  AMI=$(curl -s --max-time 5 "${TARGET}/details.php" | grep -o 'ami-[0-9a-f]\{8,\}' | head -n 1)
  echo "$(date '+%H:%M:%S')  StatusCode=${RESULT}  AMI=${AMI:-n/a}"
  sleep 2
done
Cấp quyền thực thi và chạy script với DNS name của Load Balancer:
chmod +x watchscript.sh

ALB=$(aws cloudformation describe-stacks --stack-name pattern3-app --region ap-southeast-2 --query "Stacks[0].Outputs[?OutputKey=='OutputPattern3ALBDNSName'].OutputValue" --output text)

./watchscript.sh "http://${ALB}"
Tạo file watchscript.ps1 với nội dung sau:
# Theo doi tinh kha dung cua ung dung trong suot qua trinh Blue/Green deployment.
# Cach dung: .\watchscript.ps1 -Target http://<ALB_DNS_NAME>

param([Parameter(Mandatory = $true)][string]$Target)

while ($true) {
    $time = Get-Date -Format 'HH:mm:ss'
    try {
        $sw = [System.Diagnostics.Stopwatch]::StartNew()
        $resp = Invoke-WebRequest -Uri $Target -UseBasicParsing -TimeoutSec 5
        $sw.Stop()
        $status = "$($resp.StatusCode) $([math]::Round($sw.Elapsed.TotalSeconds,3))s"
    } catch {
        $status = "LOI $($_.Exception.Message)"
    }

    $ami = 'n/a'
    try {
        $details = Invoke-WebRequest -Uri "$Target/details.php" -UseBasicParsing -TimeoutSec 5
        $m = [regex]::Match($details.Content, 'ami-[0-9a-f]{8,}')
        if ($m.Success) { $ami = $m.Value }
    } catch { }

    Write-Output "$time  StatusCode=$status  AMI=$ami"
    Start-Sleep -Seconds 2
}
Chạy script với DNS name của Load Balancer:
$ALB = aws cloudformation describe-stacks --stack-name pattern3-app --region ap-southeast-2 --query "Stacks[0].Outputs[?OutputKey=='OutputPattern3ALBDNSName'].OutputValue" --output text

.\watchscript.ps1 -Target "http://$ALB"
Nếu PowerShell từ chối chạy script, hãy cho phép trong phạm vi phiên hiện tại:
Set-ExecutionPolicy -Scope Process -ExecutionPolicy Bypass
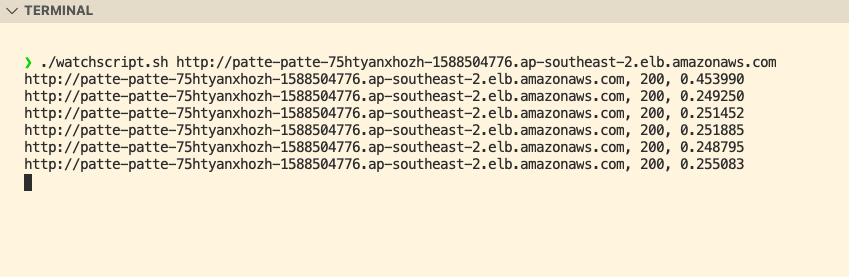
Đoạn mã sẽ liên tục gửi request và in ra StatusCode kèm AMI ID đang phục vụ. Nhờ vậy bạn thấy được chính xác thời điểm AMI được thay thế, và quan trọng hơn là ứng dụng có bị gián đoạn hay không.
Thực thi Automation Document
Một khi Monitoring Script đã chạy, chúng ta tiến hành thực thi Automation Document. Bạn làm theo một trong hai cách dưới đây.
Cách 1: từ AWS Console
- Ở thanh điều hướng bên tay trái, trong nhóm Change Management Tools, chọn Automation.
- Nhấn nút
Execute runbook. - Ở tab Owned by me, chọn
pattern3-automate-CreateImagerồi nhấn Next - Trang Execute automation runbook mở ra. Ở phần chọn chế độ, giữ
Simple execution. - Ở phần Runbook details, giữ
Runbook versionlà$DEFAULT. - Ở phần Input parameters, điền:
ImageBuilderPipeline: nếu tham số này đã có giá trị mặc định thì ô sẽ được điền sẵn ARN pipeline. Nếu trống, dán ARN pipeline vào.ApplicationStack: điềnpattern3-app.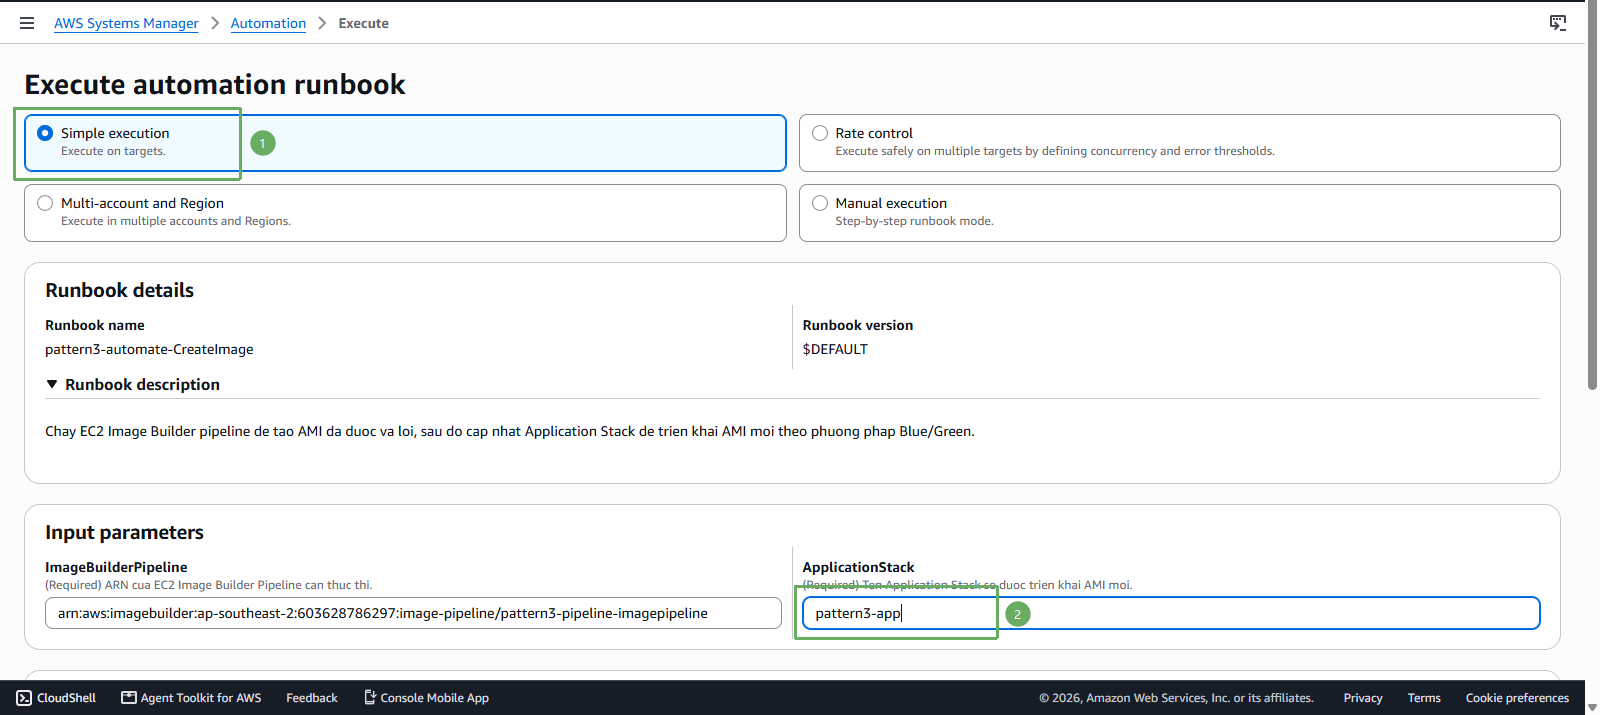
- Nhấn nút
Executeở cuối trang. - Console chuyển sang trang chi tiết của lần thực thi. Theo dõi tiến độ ở phần Executed steps, mỗi bước sẽ lần lượt chuyển từ
PendingsangInProgressrồiSuccess.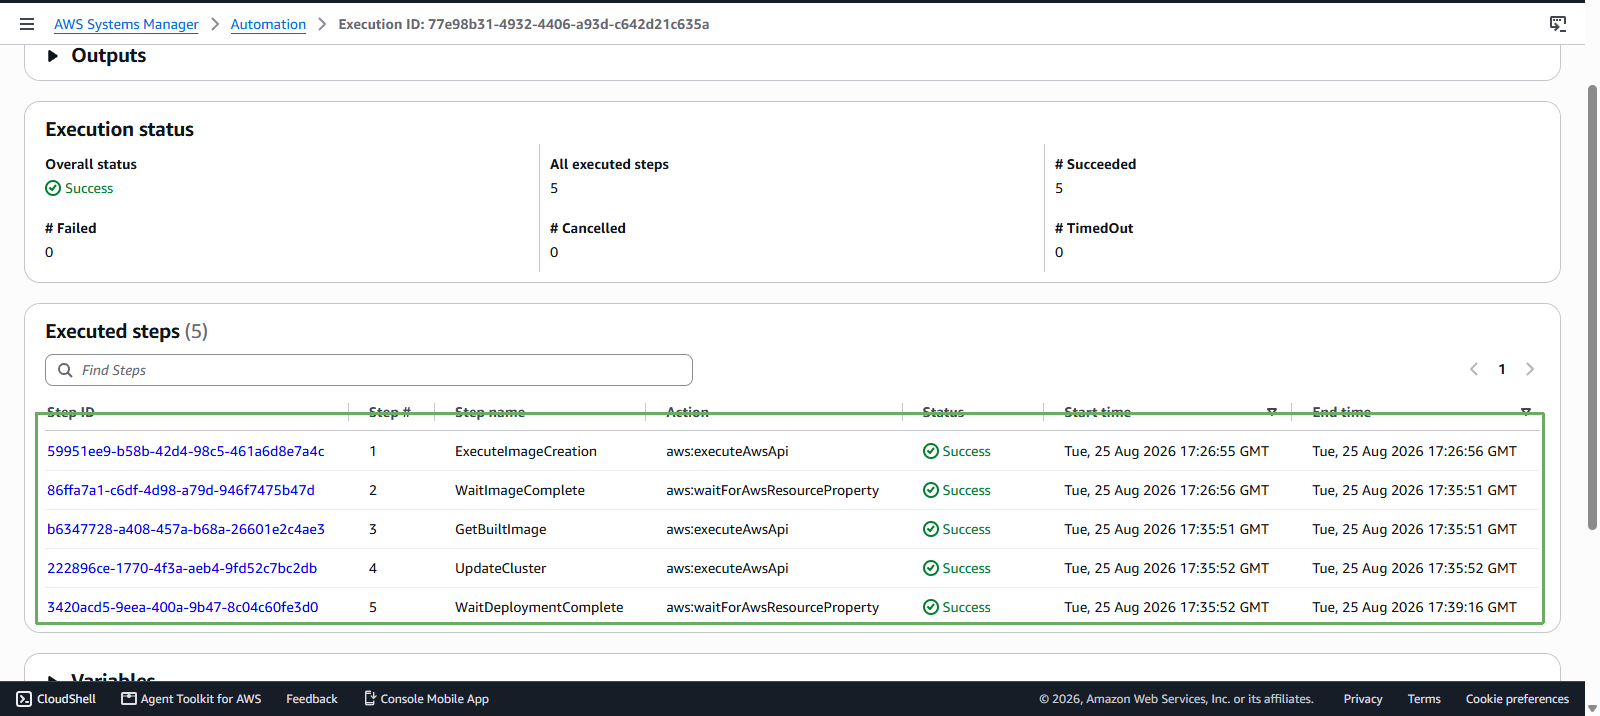
Trang thực thi có bốn chế độ, bài thực hành dùng chế độ đầu tiên:
| Chế độ | Dùng khi nào |
|---|---|
| Simple execution | Chạy một lần trên một mục tiêu. Đây là chế độ chúng ta cần |
| Rate control | Chạy trên nhiều mục tiêu, có kiểm soát mức độ đồng thời và ngưỡng lỗi |
| Multi-account and Region | Chạy đồng thời trên nhiều tài khoản và nhiều Region |
| Manual execution | Chạy từng bước một, bạn tự bấm để sang bước kế tiếp. Hữu ích khi cần gỡ lỗi |
Ô ApplicationStack thường bị bỏ trống, nhất là khi bạn tạo runbook thủ công, vì giá trị mặc định của nó chỉ được sinh ra khi triển khai bằng CloudFormation. Nếu để trống rồi nhấn Execute, bước UpdateCluster sẽ thất bại vì không biết cập nhật Stack nào. Hãy điền pattern3-app.
Cách 2: bằng AWS CLI
# Lay ten runbook do minh so huu. Bai thuc hanh chi co mot nen lay phan tu dau tien.
DOC_NAME=$(aws ssm list-documents --filters Key=Owner,Values=Self Key=DocumentType,Values=Automation --region ap-southeast-2 --query "DocumentIdentifiers[0].Name" --output text)
echo "Runbook: $DOC_NAME"

EXECUTION_ID=$(aws ssm start-automation-execution --document-name "$DOC_NAME" --parameters "ApplicationStack=pattern3-app" --region ap-southeast-2 --query "AutomationExecutionId" --output text)
echo "AutomationExecutionId: $EXECUTION_ID"
Nếu runbook của bạn chưa có giá trị mặc định cho ImageBuilderPipeline, hãy truyền cả hai tham số. Lưu ý lấy ARN vào biến chứ đừng dán chuỗi mẫu:
PIPELINE_ARN=$(aws imagebuilder list-image-pipelines --region ap-southeast-2 --query "imagePipelineList[?name=='pattern3-pipeline-ImagePipeline'].arn | [0]" --output text)

aws ssm start-automation-execution --document-name "$DOC_NAME" --parameters "ApplicationStack=pattern3-app,ImageBuilderPipeline=$PIPELINE_ARN" --region ap-southeast-2
# Lay ten runbook do minh so huu. Bai thuc hanh chi co mot nen lay phan tu dau tien.
$DOC_NAME = aws ssm list-documents --filters Key=Owner,Values=Self Key=DocumentType,Values=Automation --region ap-southeast-2 --query "DocumentIdentifiers[0].Name" --output text
Write-Output "Runbook: $DOC_NAME"

$EXECUTION_ID = aws ssm start-automation-execution --document-name "$DOC_NAME" --parameters "ApplicationStack=pattern3-app" --region ap-southeast-2 --query "AutomationExecutionId" --output text
Write-Output "AutomationExecutionId: $EXECUTION_ID"
Nếu runbook của bạn chưa có giá trị mặc định cho ImageBuilderPipeline, hãy truyền cả hai tham số. Lưu ý lấy ARN vào biến chứ đừng dán chuỗi mẫu:
$PIPELINE_ARN = aws imagebuilder list-image-pipelines --region ap-southeast-2 --query "imagePipelineList[?name=='pattern3-pipeline-ImagePipeline'].arn | [0]" --output text

aws ssm start-automation-execution --document-name "$DOC_NAME" --parameters "ApplicationStack=pattern3-app,ImageBuilderPipeline=$PIPELINE_ARN" --region ap-southeast-2
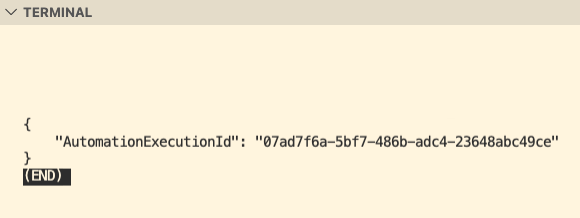
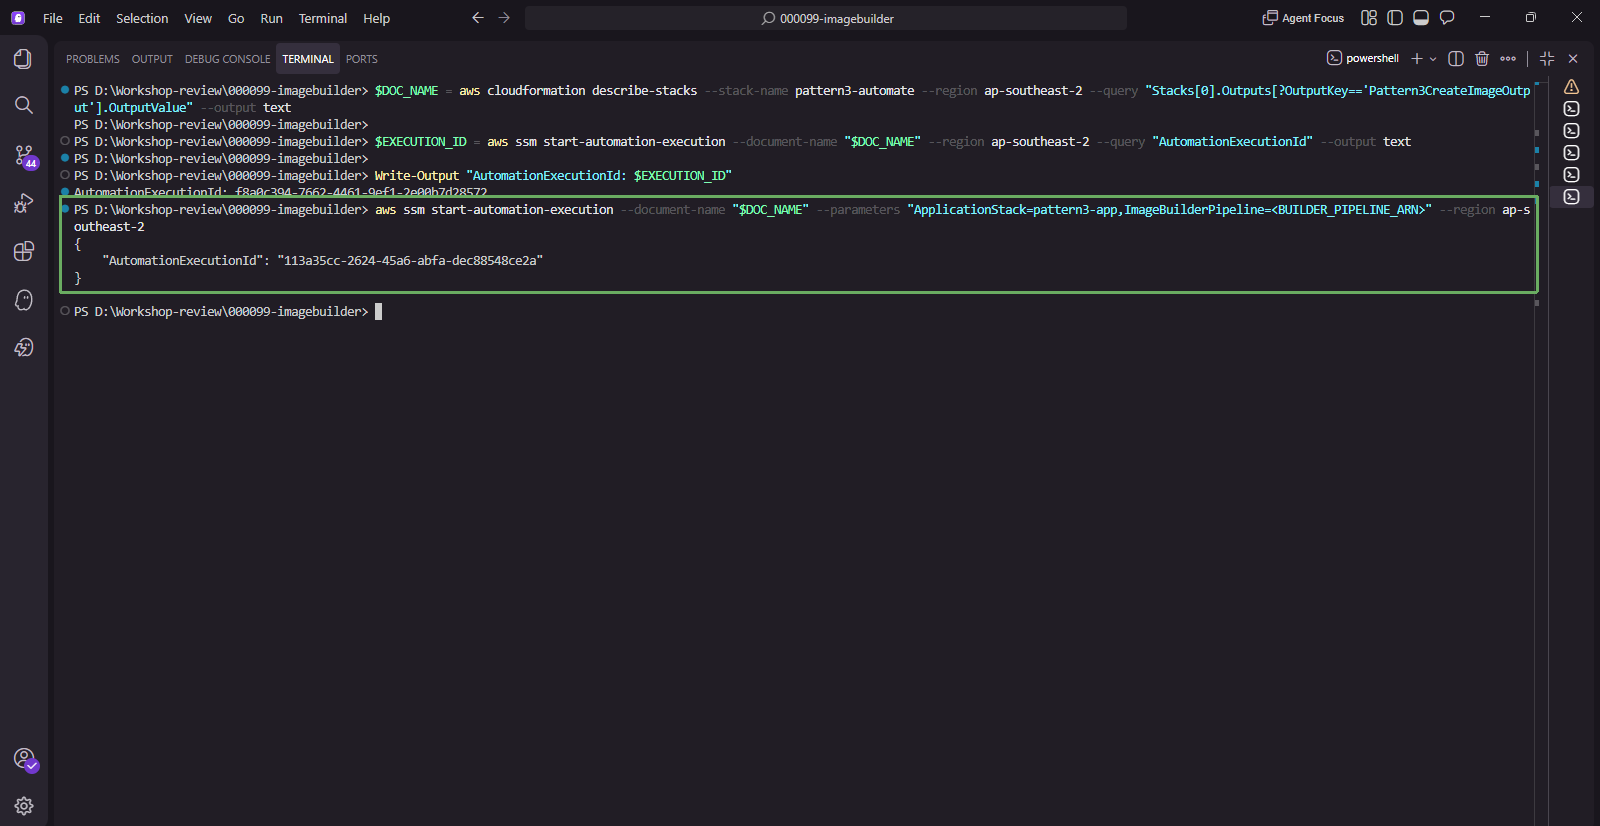
Kiểm tra trạng thái của Automation Document. Cú pháp giống nhau ở cả hai shell, chỉ khác cách khai báo biến
$EXECUTION_IDở bước trên.aws ssm get-automation-execution --automation-execution-id "$EXECUTION_ID" --region ap-southeast-2 --query "AutomationExecution.{Status:AutomationExecutionStatus,CurrentStep:CurrentStepName}" --output tableHoặc xem danh sách các lần thực thi:
aws ssm describe-automation-executions --filters "Key=ExecutionId,Values=$EXECUTION_ID" --region ap-southeast-2 --query "AutomationExecutionMetadataList[0]" --output json
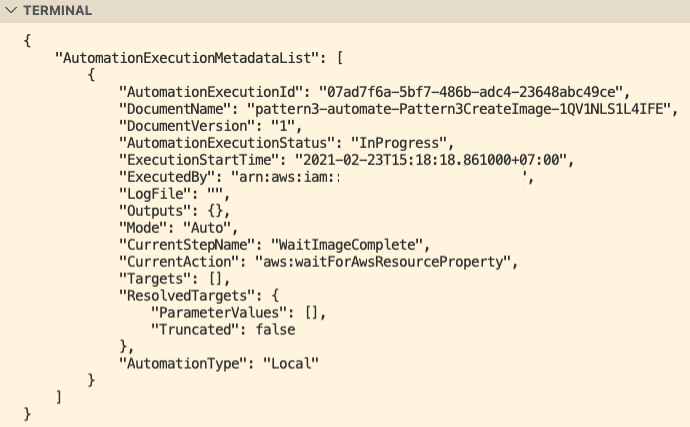
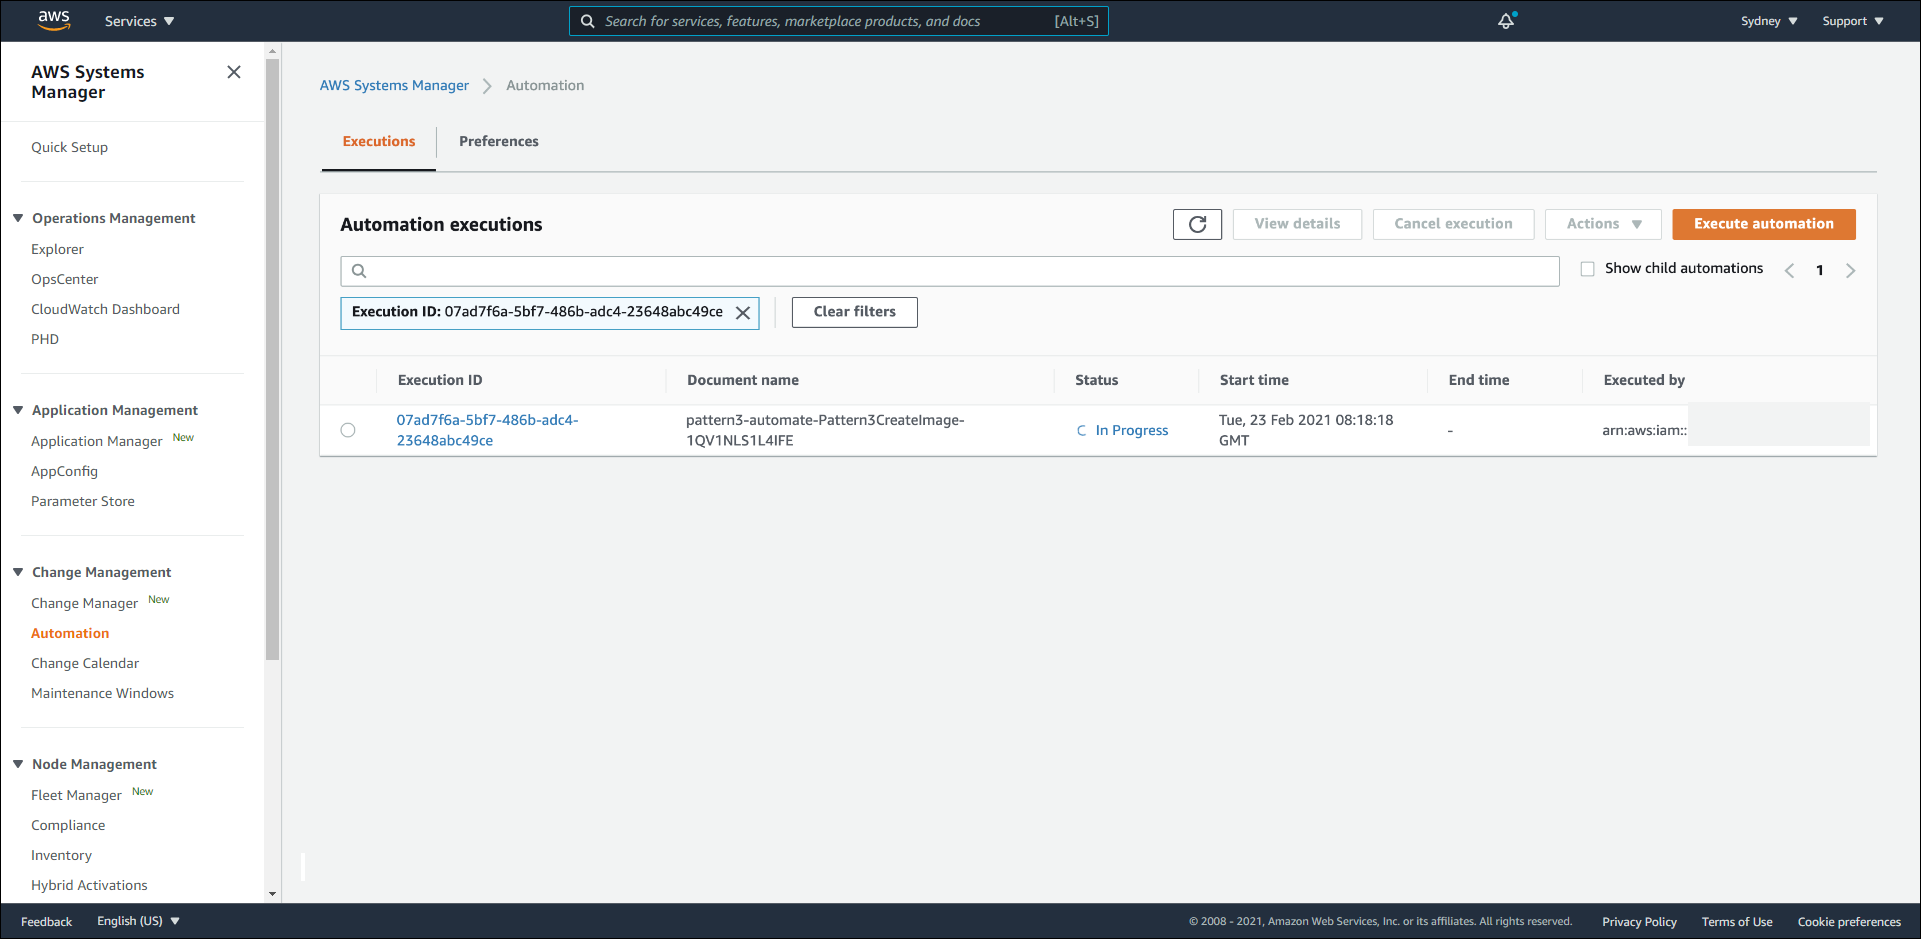
Từ AWS Console, chúng ta có thể theo dõi từng bước và trạng thái:
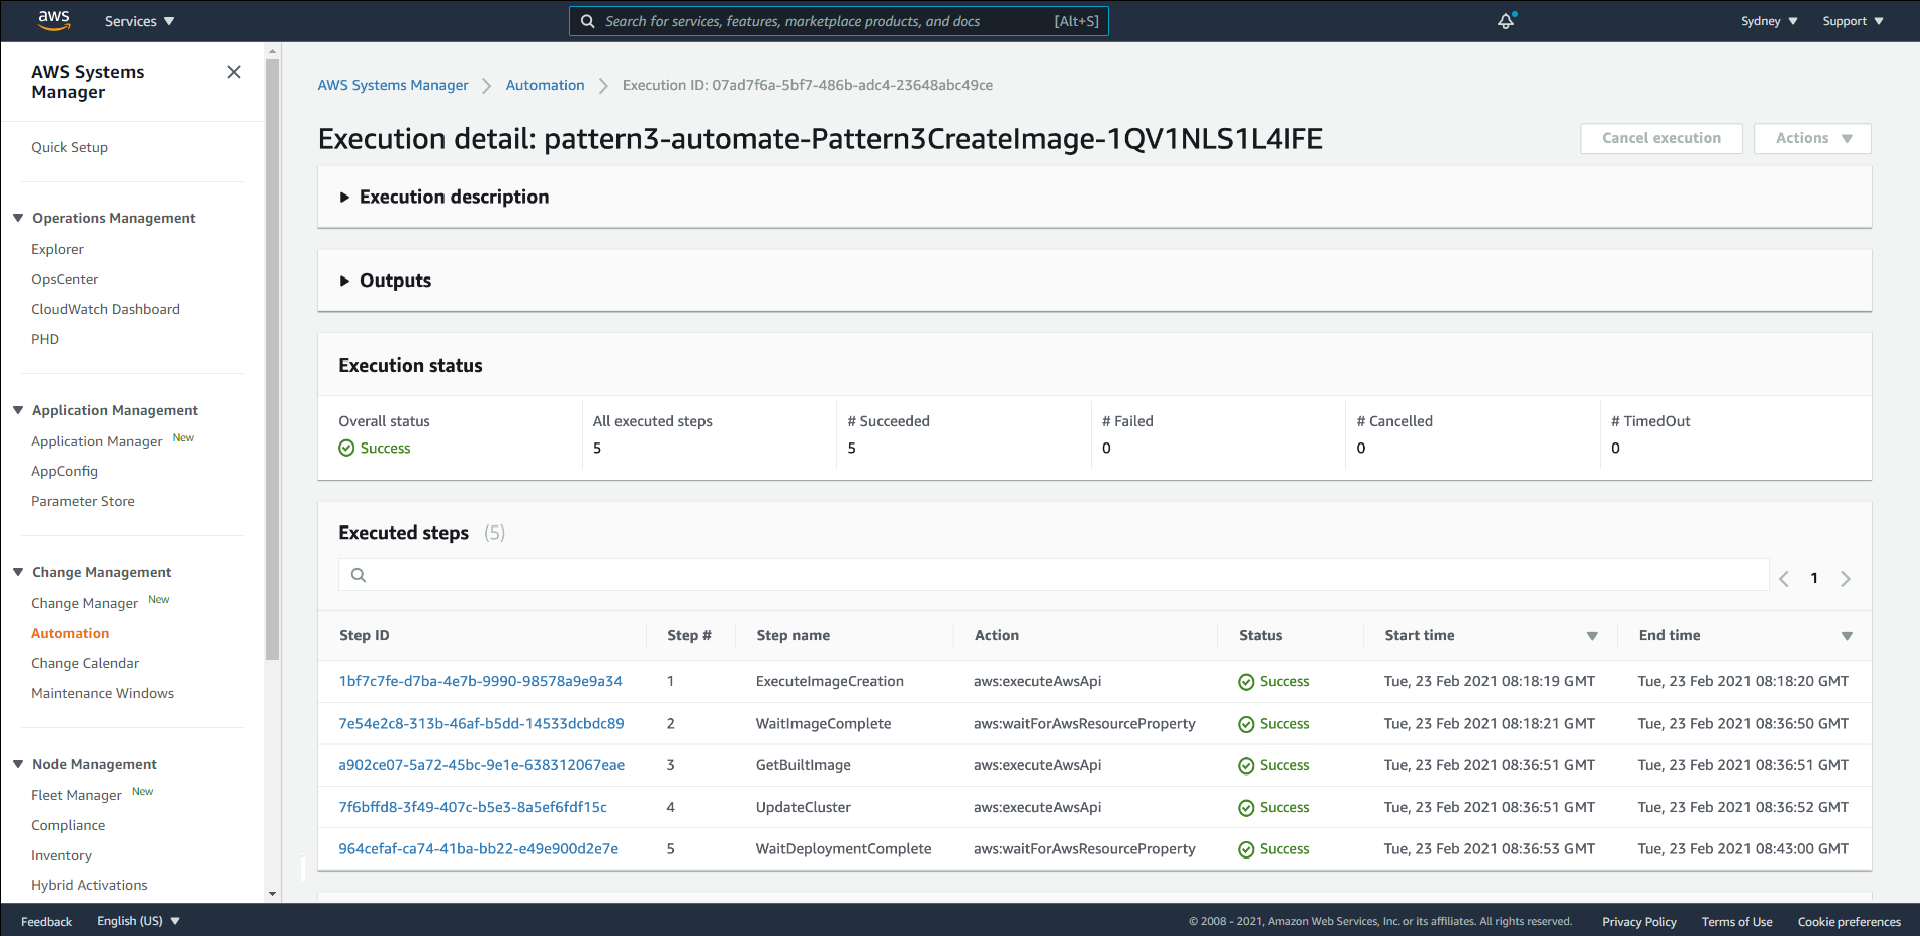
Toàn bộ quá trình mất khoảng 30 đến 45 phút, trong đó bước WaitImageComplete chiếm phần lớn thời gian. Trong lúc chờ, hãy quan sát terminal đang chạy watchscript.sh: StatusCode phải luôn là 200 xuyên suốt, kể cả ở thời điểm Auto Scaling Group được thay thế. Đó chính là giá trị mà AutoScalingReplacingUpdate mang lại.
Xác Minh AMI ID
Chúng ta sẽ tiến hành xác minh AMI ID mới liệu đã được cập nhật hay chưa bằng cách truy cập vào đường dẫn DNS URL của Application Load Balancer, thêm đường dẫn /details.php.
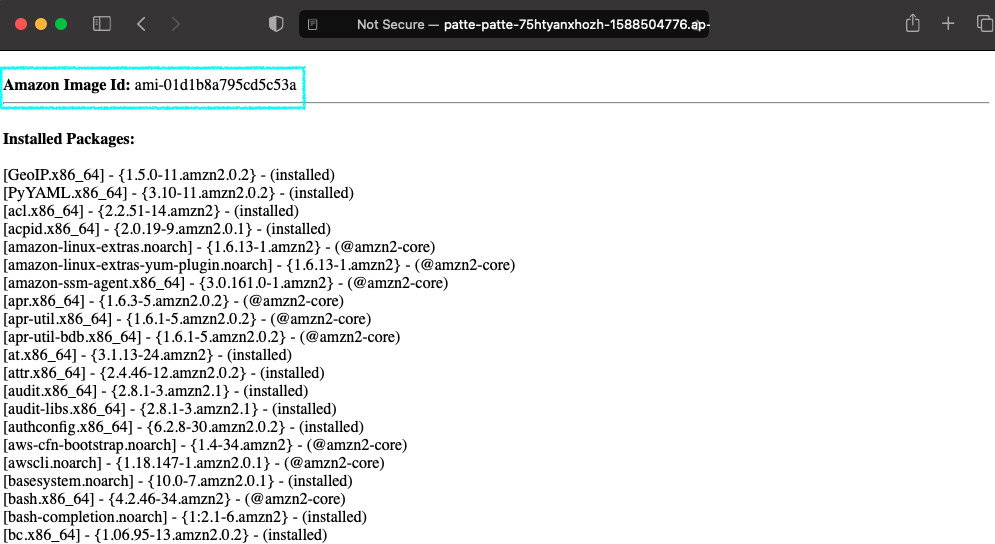
Hãy đối chiếu với các giá trị bạn đã lưu ở phần 3:
- Amazon Image Id phải là một giá trị khác, chính là AMI do Image Builder vừa tạo.
- Installed Packages thường sẽ có số lượng hoặc số phiên bản khác, phản ánh các bản vá vừa được cài đặt.
Kiểm tra nhanh bằng CLI:
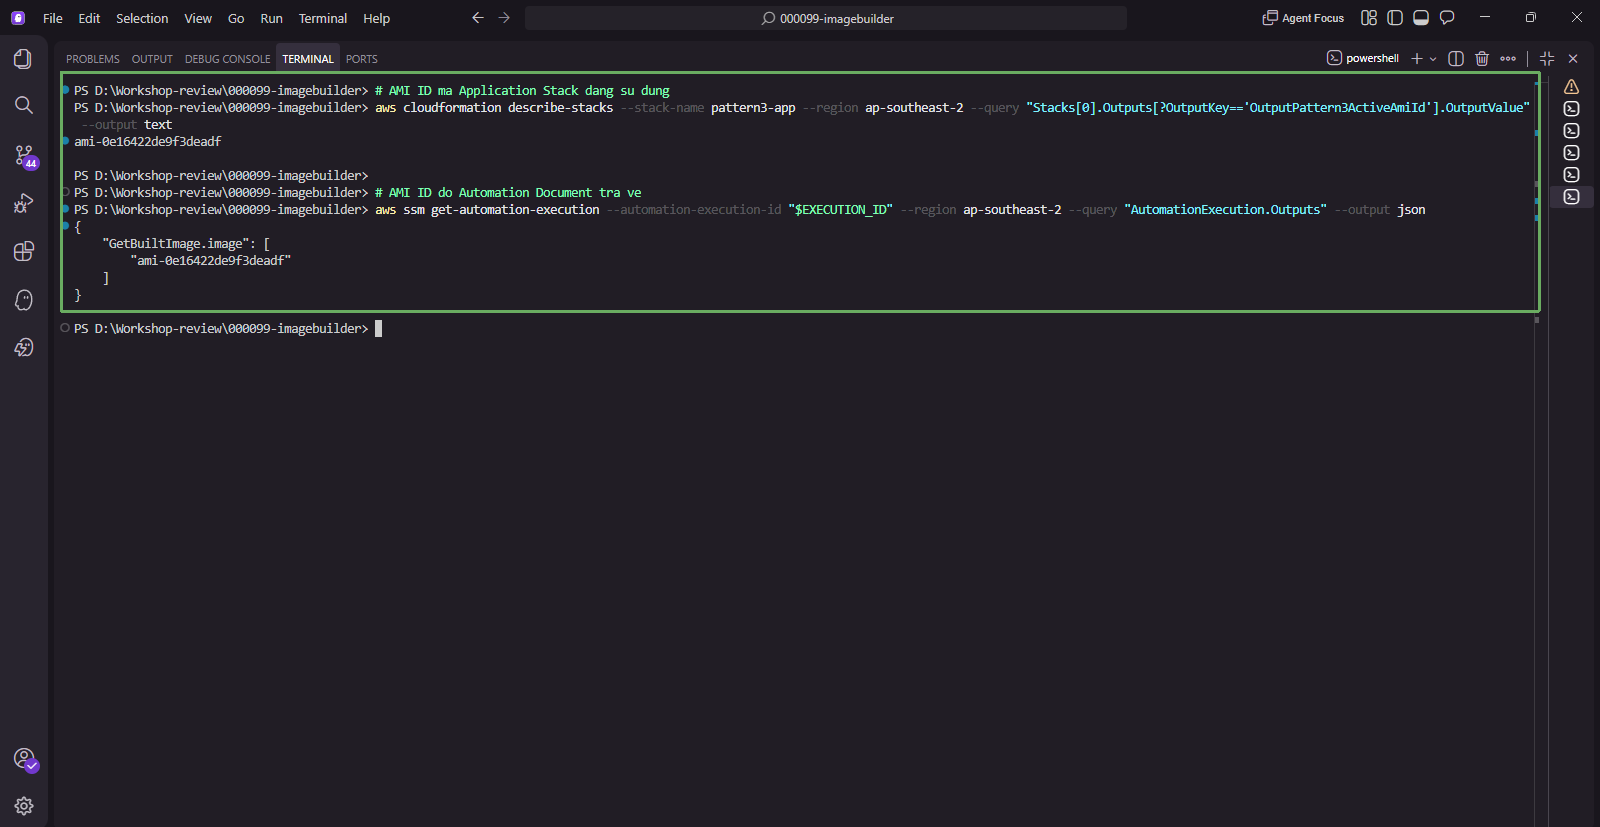
# AMI ID ma Application Stack dang su dung
aws cloudformation describe-stacks --stack-name pattern3-app --region ap-southeast-2 --query "Stacks[0].Outputs[?OutputKey=='OutputPattern3ActiveAmiId'].OutputValue" --output text

# AMI ID do Automation Document tra ve
aws ssm get-automation-execution --automation-execution-id "$EXECUTION_ID" --region ap-southeast-2 --query "AutomationExecution.Outputs" --output json
Hai giá trị này phải trùng nhau.
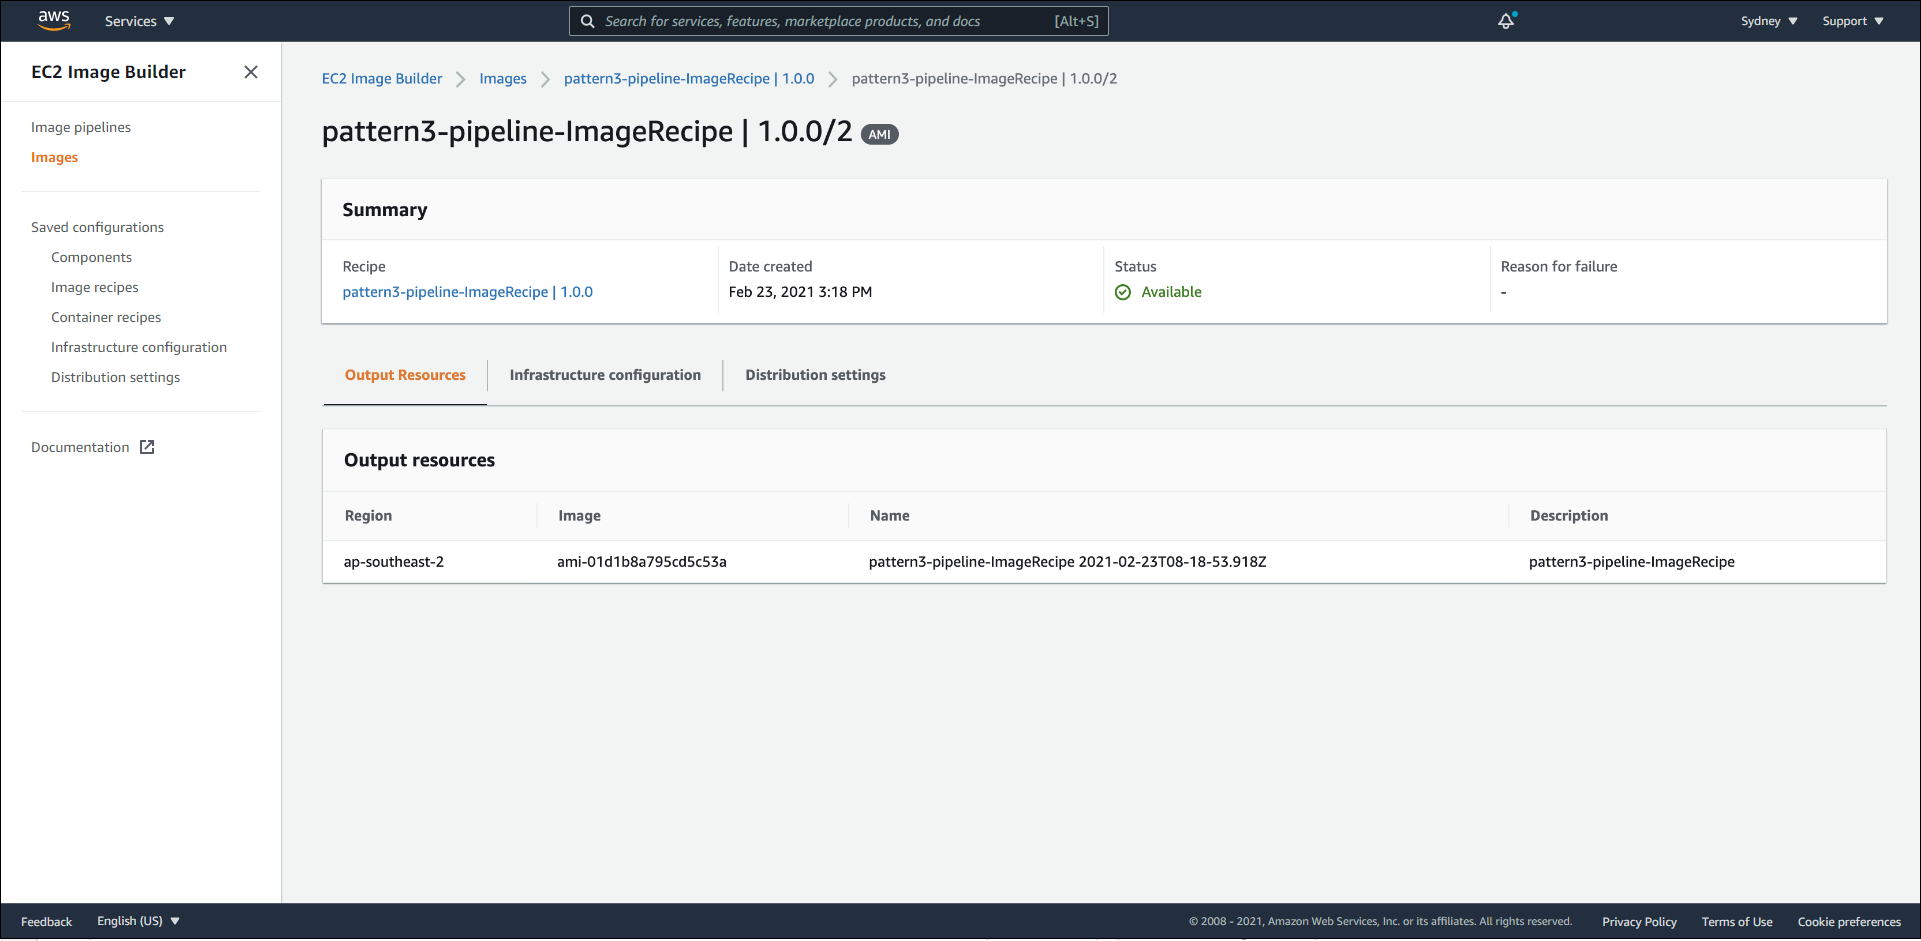
Tại bước Step 1: ExecuteImageCreation, ở phần Outputs, chúng ta lấy thông tin của Pipeline Execution ARN.
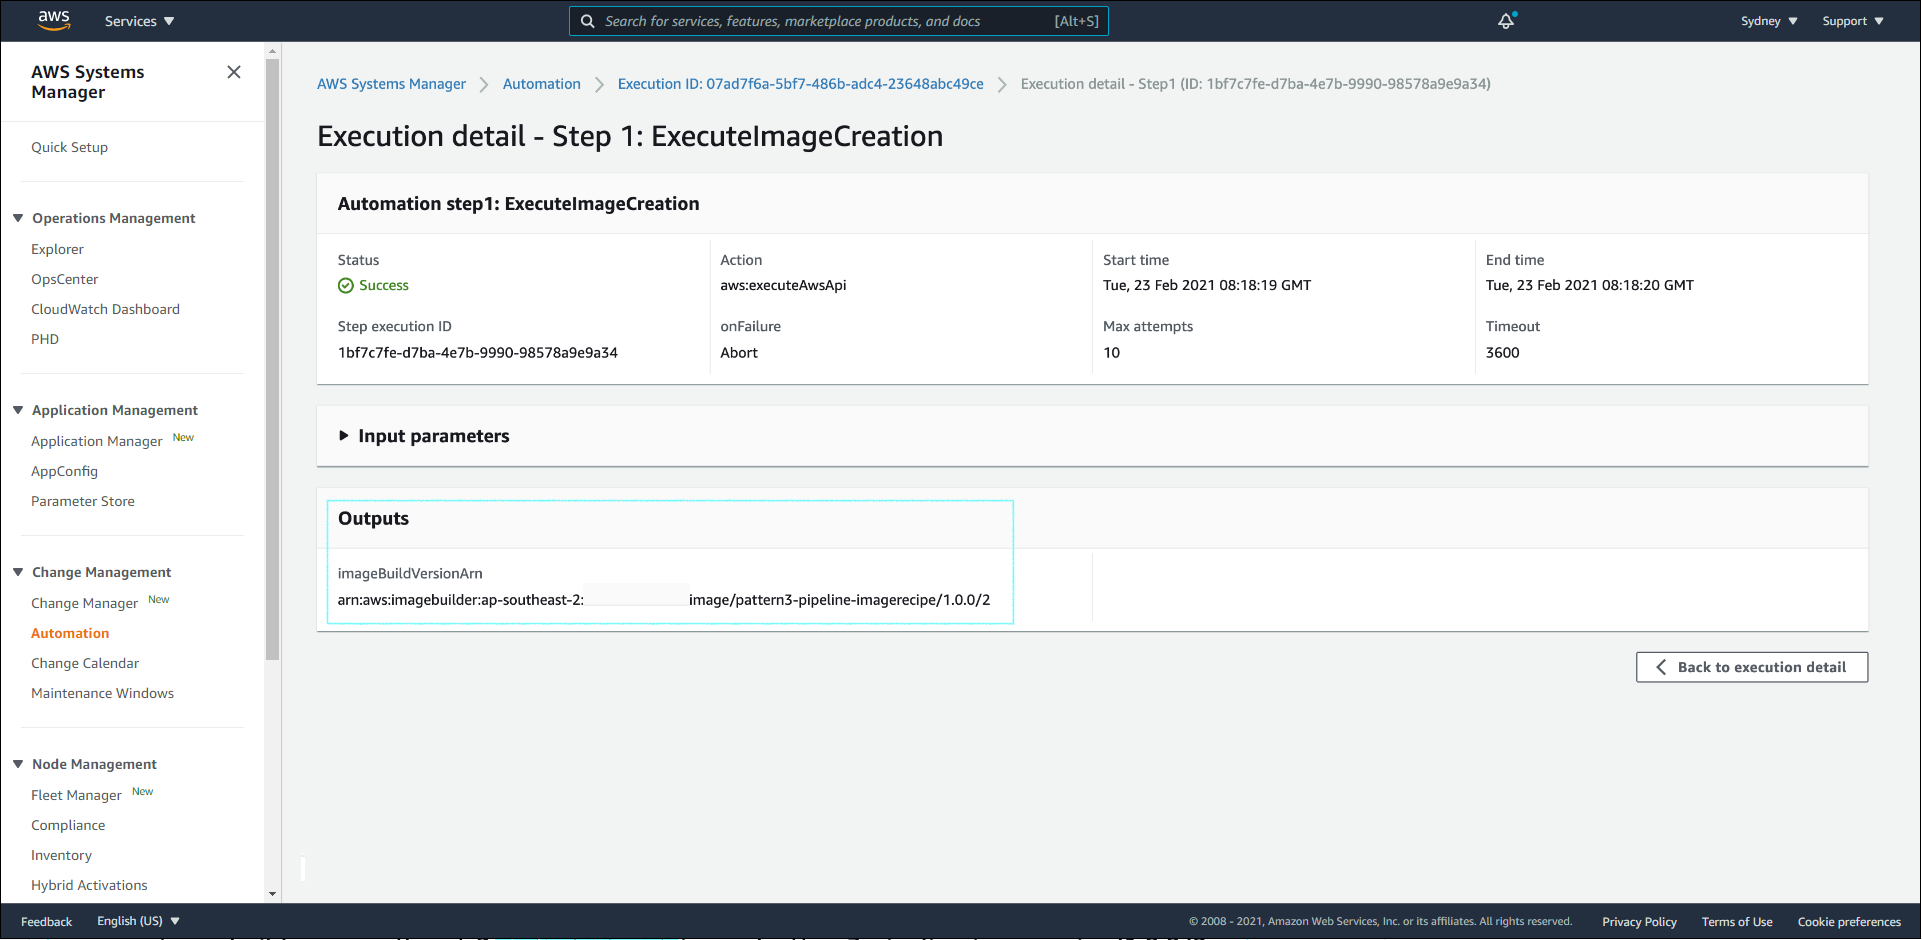
Sau đó, chúng ta có thể đối chiếu với giá trị ở dịch vụ EC2 Image Builder.
Cuối cùng, hãy dừng watchscript.sh bằng Ctrl + C và chuyển sang phần Dọn dẹp tài nguyên.